ELECDURA NETWORK

Your Whole New Supply Chain For Heavy-Duty Parts
Whatsapp:
+86 18915027366
Phone:
+86 18915027366
Views: 0 Author: Site Editor Publish Time: 2026-07-21 Origin: Site
Alternator bearing noise may sound like a rumble, whine or grind, but the sound alone cannot identify the failed part. First separate the alternator from the belt, tensioner, idler and neighboring accessories using the vehicle maker's safe diagnostic procedure. Bearing-only repair needs more than a quiet replacement bearing: shaft and housing fits, pulley alignment and electrical condition must also pass the applicable checks. Grinding with contact marks, pulley instability or belt damage warrants stopping the test and arranging qualified inspection, not another trial run.
Elecdura supports commercial vehicle and off-highway buyers that need OE-reference matching for aftermarket charging components. The heavy-duty alternator range gives importers, distributors, and repair businesses a product path, while this guide focuses on the mechanical evidence needed to decide whether a bearing, pulley, belt drive, housing, or complete alternator requires attention.
Bearing diagnosis should be performed with appropriate guarding, isolation, and equipment-specific procedures. Rotating belts, fans, hot surfaces, and high-current terminals create serious hazards. The goal here is to explain the failure logic and evidence, not to replace the vehicle or alternator manufacturer's service instructions.
Noise is a clue about motion, load, lubrication, surface damage, and resonance. It is not a component label. Record when the sound occurs, how it changes with engine speed, electrical load, temperature, belt condition, and moisture, and whether it remains after the accessory drive is safely isolated according to the service procedure.
A low mechanical rumble that follows shaft speed can indicate rough bearing raceways, rolling-element damage, contamination, or loss of lubrication. It may become clearer as the unit warms and internal clearance changes. A rough idler or tensioner bearing can create the same pattern and must be separated by location.
Whine can arise from bearing load, but it can also be electromagnetic. Stator, diode, regulator, and electrical-load conditions can change magnetic noise. If the pitch or intensity changes sharply when electrical loads are switched, investigate charging output and ripple alongside the mechanical checks.
A chirp often points toward belt tracking, pulley alignment, glazing, contamination, or tensioner movement. It may occur once per pulley revolution when a groove or belt section is damaged. Do not interpret every belt-area sound as internal bearing failure.
Grinding can indicate advanced bearing damage or rotor-to-stator contact. Scraping may also come from a loose fan, shield, pulley, or foreign material. Continued operation can turn a repairable bearing problem into rotor, stator, housing, and belt damage.
A useful noise report includes engine speed, alternator load, battery state, ambient temperature, warm or cold condition, and whether the vehicle is stationary or operating. “Noisy alternator” alone gives a supplier or warranty team little diagnostic value.
Most conventional alternators support the rotor shaft with a drive-end bearing near the pulley and a rear bearing near the slip-ring or regulator side. Their sizes, retention methods, seals, and loads can differ. A heavy-duty unit may also use design-specific supports that require the correct service data and tools.
The front bearing carries significant radial load from belt tension and can experience additional force from pulley misalignment, excessive tension, impact, or a bent shaft. Because it sits near the drive, its symptoms are often confused with pulley or belt noise.
The alternator pulley guide for heavy-duty trucks explains how groove profile, offset, diameter, and runout can create side load. Bearing replacement without correcting those conditions can lead to a repeat failure.
The rear bearing supports the opposite end of the rotor and helps maintain the rotor-to-stator air gap. It may be smaller and can be affected by heat from the rectifier and regulator area, contamination through cooling openings, housing misalignment, or incorrect assembly during rebuilding.
A good bearing can fail when the shaft journal is worn, the housing bore is loose, the fit is distorted, or installation force passes through the rolling elements. Fretting, spinning in the bore, creep on the shaft, and incorrect retention can produce noise that returns after a bearing-only repair.
Check belt condition, belt dust, pulley damage, missing grooves, fan contact, loose fasteners, bracket cracks, wire contact, oil contamination, and signs of overheating. Look for a pulley that sits out of plane or a tensioner that is near its travel limit.
Observe from a safe position using approved diagnostic methods. A sound proportional to engine speed suggests a rotating component. A sound that changes mainly with electrical load may involve alternator torque, belt slip, magnetic noise, or internal electrical faults rather than bearing roughness alone.
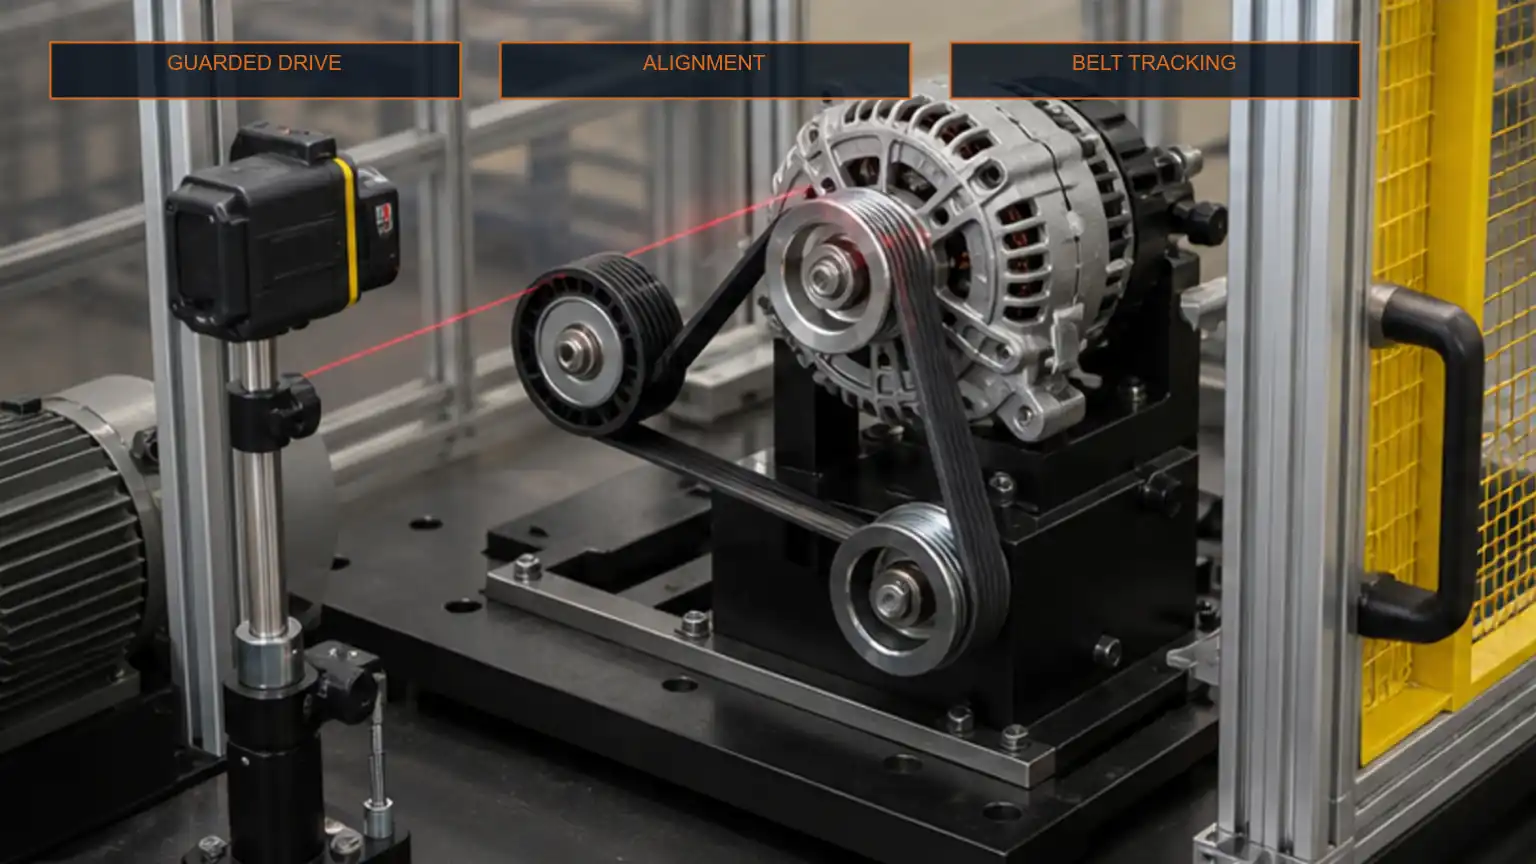
Where the service procedure permits, install approved remote acoustic or vibration sensors with the engine stopped and secured. Route leads clear of the drive, restore guards, then compare repeatable locations from a safe position. Do not reach a hand-held contact probe through a running belt or fan area. Sound travels through brackets and engine castings, so the loudest point is evidence, not final proof.
When the service procedure permits, remove or isolate the belt and rotate accessories by hand with the engine off. Feel for roughness, drag, looseness, or uneven motion. A bearing can be damaged without obvious play, and belt removal also changes shaft load, so combine this result with running evidence.
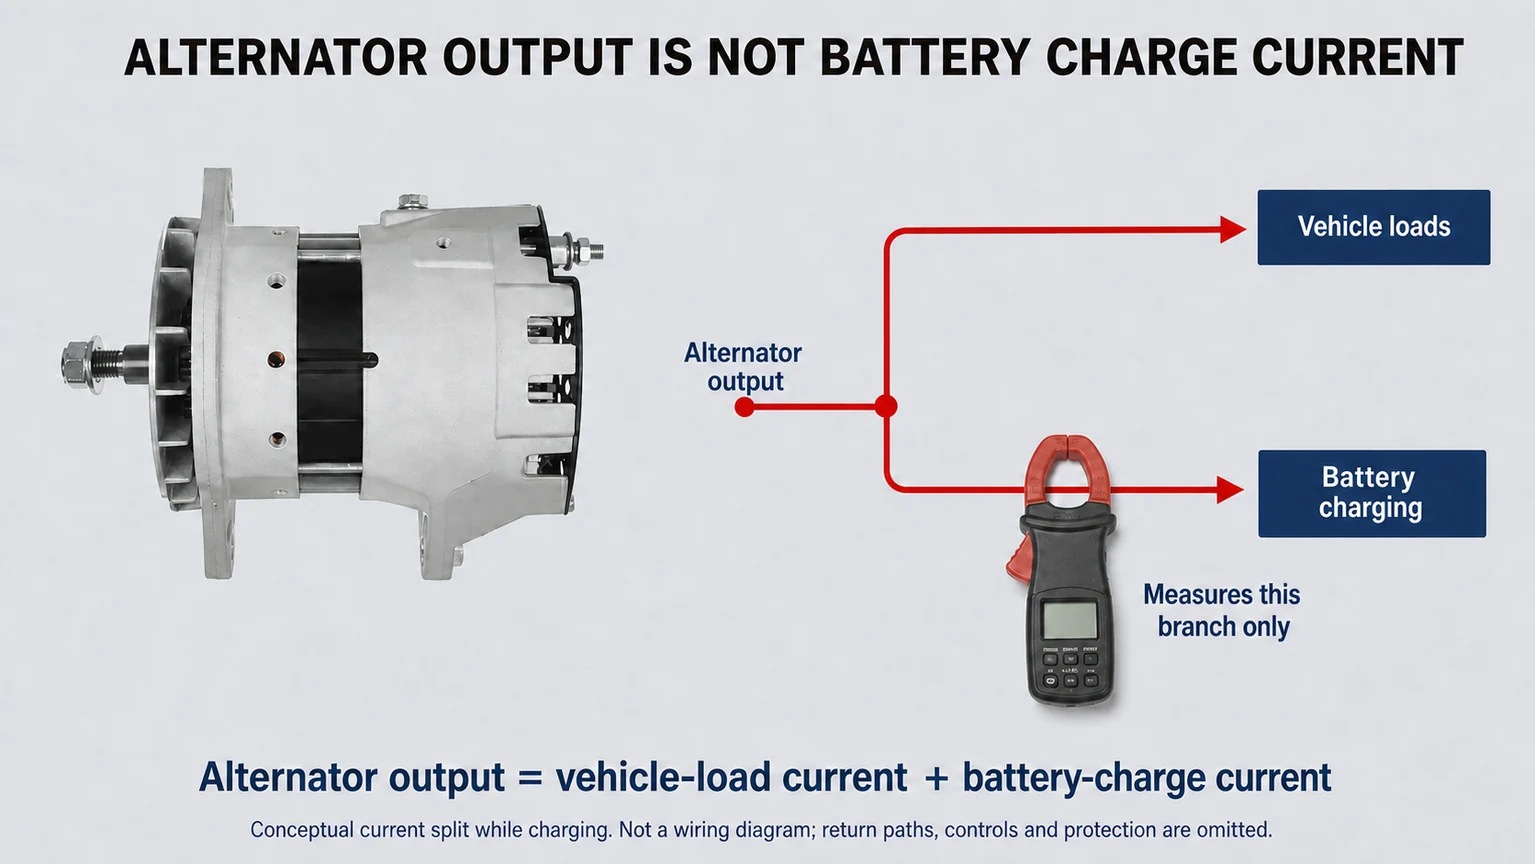
Record battery condition, system voltage, current output, voltage drop, and AC ripple under defined conditions. Electrical faults can create whine and heat. Mechanical drag can also lower output or increase belt demand. The diagnosis should reconcile both sides of the alternator.
Record where current was measured. Battery-branch current is not total alternator output; this conceptual charging-state illustration is not a wiring diagram.
Improvised contact tools near rotating equipment can slip into belts or fans. Use tools and access methods approved for the vehicle. Safety is more important than obtaining a faster noise comparison.
Drive-system illustration, not a running-test record. Guards must be closed and approved procedures followed before operation.
A rough tensioner or idler can transmit vibration through the belt and alternator bracket. Watch for tensioner oscillation, travel irregularity, damaged damping, pulley wobble, and belt dust. Compare each component after safe isolation.
A bent pulley, worn bore, incorrect installation, or failed overrunning pulley can create noise and torsional vibration. Check pulley retention and runout. Some pulley faults appear only during deceleration or rapid load changes.
A bent or loose bracket can angle the alternator and load the front bearing. Repeated front-bearing failure is a reason to measure mounting planes, sleeves, braces, and fastener condition rather than simply installing another bearing.
Neighboring accessories can be acoustically deceptive. An AC clutch bearing may change sound when the compressor engages. A fan hub may change with fan command. A water pump may show coolant evidence or shaft movement. Follow the belt routing and compare operating states.
A failed diode or stator phase can create an abnormal electrical tone and ripple while output remains partially available. If the sound follows electrical loading more than shaft condition, extend the test beyond the bearings.
Disassembly evidence can confirm the cause and determine whether a bearing-only repair is reasonable. Preserve photos and part orientation before cleaning. Cleaning too early can remove lubricant condition, contamination paths, heat marks, and fretting patterns useful for warranty analysis.
Pitting, spalling, scoring, brinelling, discoloration, or uneven wear indicate different stress histories. Repeating marks spaced like rolling elements can follow impact or static overload. Flaking can develop after fatigue or contamination disrupts the contact surface.
Dry, hardened, washed, contaminated, or heat-discolored grease shows the environment in which the bearing operated. More grease is not automatically better; overfilling can increase churning and temperature. Replacement bearings should match the specified clearance, seal, lubricant, speed, and temperature requirements.
Dust, water, cleaning chemicals, oil, and fine metallic debris can enter through damaged seals or harsh airflow paths. Identify whether contamination came from outside, from nearby component failure, or from improper handling before installation.
A polished or dark shaft seat, enlarged housing bore, fretting debris, or transferred material can show movement between the bearing and its fit. Installing a new bearing into an out-of-tolerance journal or bore does not restore the original support.
Bearing looseness can allow the rotor to touch the stator. Look for rub marks, damaged insulation, magnetic debris, and housing distortion. At that stage, a complete alternator replacement may be more reliable than replacing bearings and ignoring collateral damage.
Long idle periods can combine low cooling airflow with substantial electrical demand. The alternator may operate hot while belt forces remain significant. Heat reduces lubricant life and affects internal clearances, especially when the unit is installed near exhaust or restricted airflow.
For fleets planning output capacity, the high-output alternator guide helps relate idle demand to alternator selection. Overspecification is not the only answer; cooling, pulley ratio, mounting, battery condition, and load management remain important.
Agricultural, construction, refuse, and mining equipment can expose alternators to dust, mud, water, and cleaning chemicals. Sealed or protected designs must still release heat. Pressure washing directed at bearing and electrical openings can force contamination past barriers.
Rough roads, engine vibration, equipment impact, and unsupported alternator mass add dynamic load. Loose mounts amplify movement. A rear brace or application-specific bracket can be essential for controlling shaft and housing alignment.
A damaged battery bank or high-resistance cable can keep the alternator near maximum output for extended periods. The added electromagnetic torque and heat increase belt and bearing stress. Correct the charging-system load problem when replacing a mechanically damaged unit.
A bearing repair is more defensible when the alternator is correctly identified, the shaft and housings remain within specification, rotor and stator are undamaged, rectifier and regulator tests pass, slip rings are serviceable, contamination is controlled, and qualified tools and procedures are available.
Rotor-to-stator contact or winding insulation damage is present.
The shaft journal or housing bore cannot retain the bearing correctly.
Rectifier, regulator, stator, rotor, and bearing faults occur together.
The alternator has severe corrosion, heat damage, or unknown rebuilding history.
Downtime cost is high and repair validation cannot be completed reliably.
A verified aftermarket replacement offers better repeatability and warranty handling.
Two bearings may share outside diameter, inside diameter, and width while differing in internal clearance, seal, cage, speed rating, lubricant, or temperature capability. Use the alternator service specification or verified bearing reference, not only caliper measurements.
Use this as a job-card summary, not a universal acceptance standard. Record the applicable alternator reference and service-document revision beside the measured results.
Finding | Required disposition | Release evidence |
|---|---|---|
Roughness isolated to a bearing | Check the surrounding assembly before choosing bearing-only repair. | Bearing reference; shaft, housing and rotor inspection results. |
Loose seat or rotor contact | Do not release a bearing-only substitution. | Approved component repair or replacement, followed by validation. |
Noise varies with electrical load | Investigate charging-system and drive faults together. | Test conditions, measurement points, output and ripple results. |
Replacement installed | Recheck the original complaint under the permitted operating conditions. | Drive inspection, warm-condition comparison and technician sign-off. |
For an interference-fit bearing, SKF describes supporting the ring being fitted so installation force does not pass through the rolling elements. The exact tooling, fit and retention method still come from the alternator-specific repair instructions; a matching outside diameter is not a repair specification.
For critical equipment, record baseline vibration or sound after installation and compare readings during scheduled service. A trend is more useful than one subjective description. Note sensor position, engine speed, electrical load, temperature, and measurement tool.
A charging complaint should trigger a quick belt, pulley, tensioner, bracket, cable, ground, and battery review. This catches mechanical contributors before they damage the replacement. It also provides a clearer cause code for fleet records.
Retain failed units until warranty and root-cause review are complete. Photograph labels, installation, belt path, pulley plane, terminals, heat marks, and disassembled evidence when appropriate. Link the evidence to vehicle hours, mileage, duty cycle, and prior repairs.
Vehicle and engine identification plus operating hours or mileage
Alternator reference, batch or label, installation date, and failure date
Battery test, charging voltage, current, ripple, and cable voltage-drop results
Belt, tensioner, pulley, bracket, and alignment observations
Noise or vibration condition with engine speed and electrical load
Photos of the installed unit and preserved failure evidence
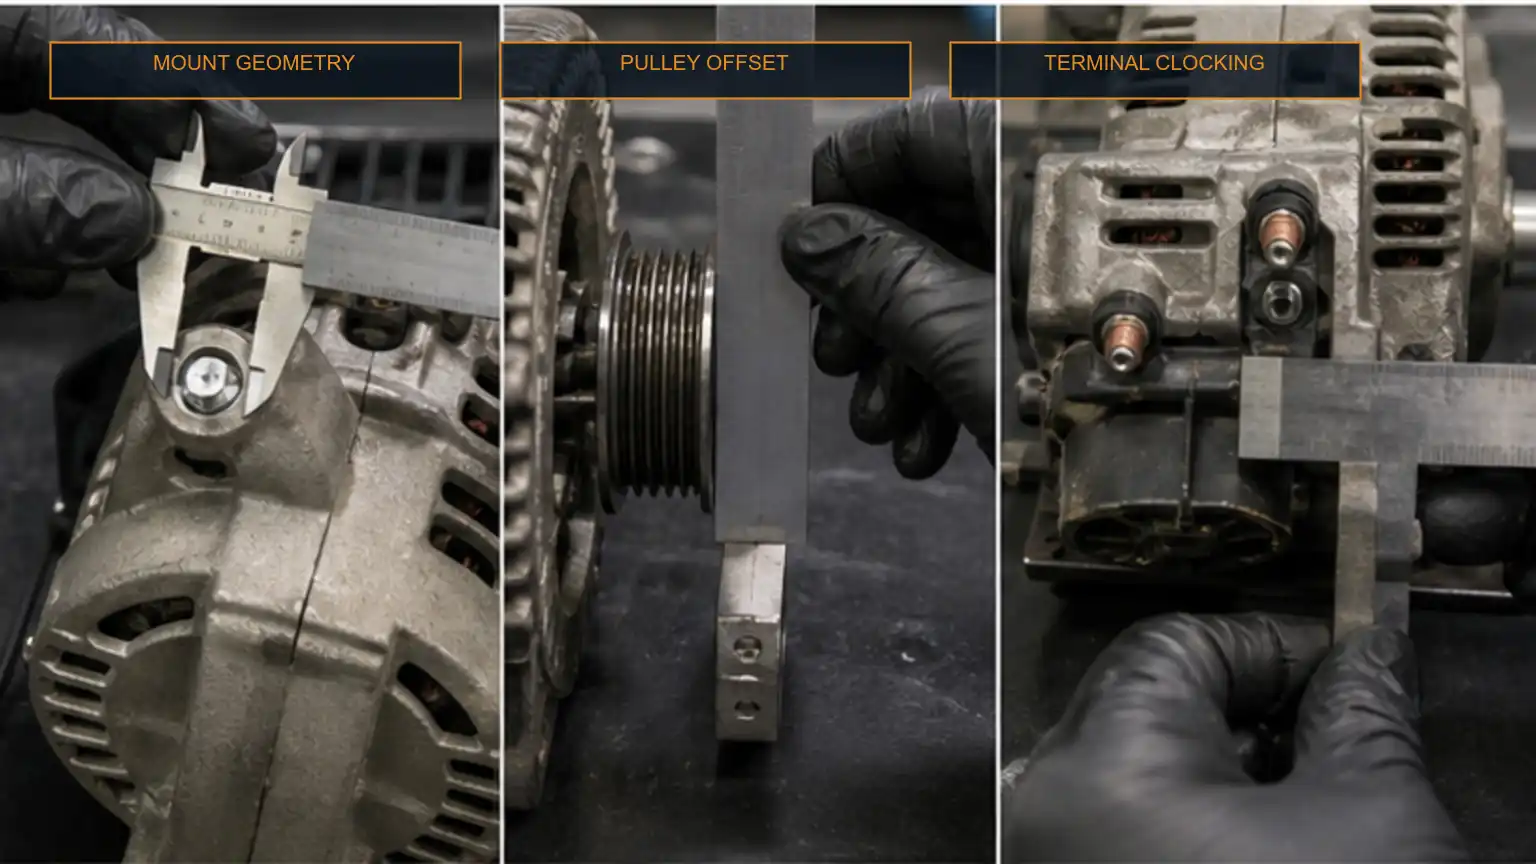
A buyer cannot judge bearing life from a polished product photo. Ask how the alternator is matched, assembled, balanced, tested, packaged, and controlled across batches. Confirm whether pulley and mounting options change bearing load for the intended application.
Mounting, pulley and terminal features belong in the replacement enquiry. The illustration supplies no measured dimensions or application approval.
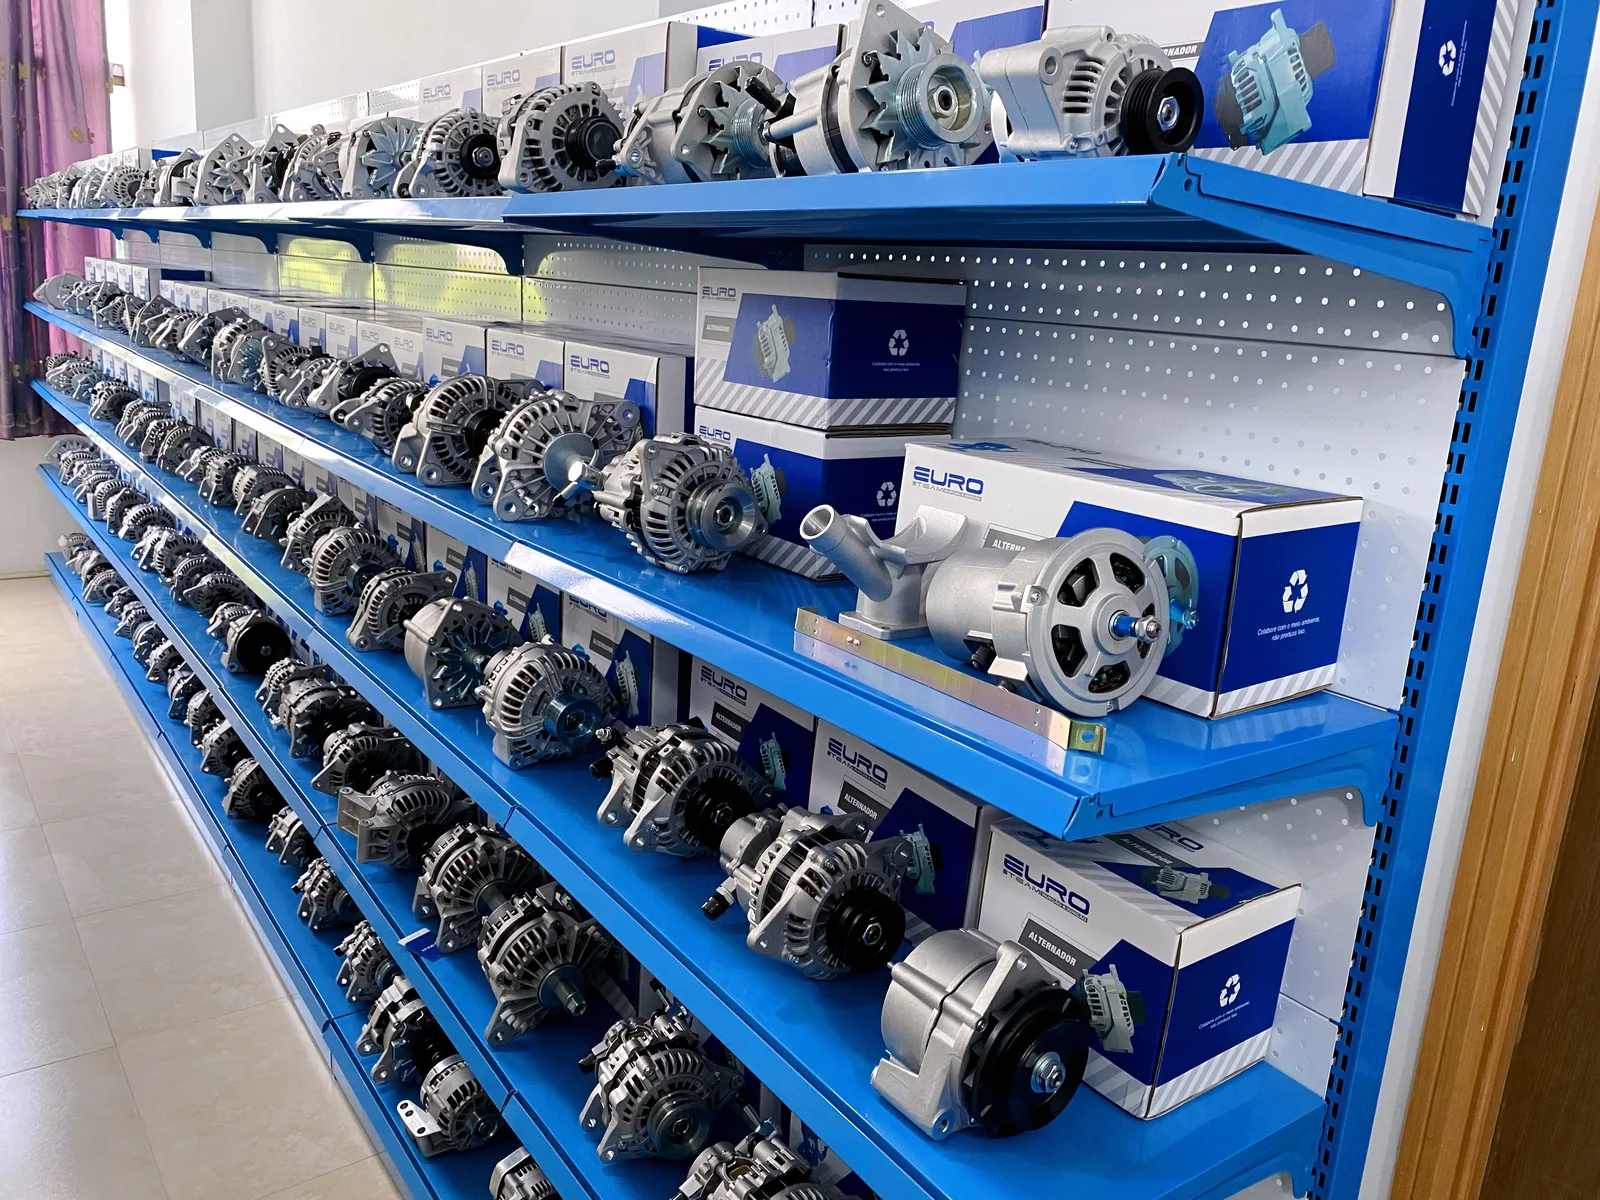
Real exterior reference with third-party branding preserved. Visible housings and pulleys can guide identification questions, but this image does not establish bearing condition, fitment or inventory ownership.
OE number, alternator label, application, engine, and duty cycle
Voltage, amperage, idle-load demand, pulley, mounting, and rotation
Operating environment including dust, moisture, heat, and vibration
Observed failure pattern and evidence from previous units
Sample quantity, annual demand, packaging, labeling, and inspection needs
Brand references can help identify fitment, but they do not prove genuine status. Unless authenticity is verified, use aftermarket replacement, aftermarket equivalent, or alternator for OE number matching. That distinction should remain clear in quotations, product pages, and downstream distributor communication.
Buyers can send reference numbers, old-unit photos, application data, and quantity requirements through the Elecdura contact page. Include the bearing-failure evidence so the proposed replacement can be checked against the original application. Do not change pulley ratio, brackets, output class or controls without the required application approval.
No. An output check does not measure bearing condition. Treat voltage, current and ripple results as one part of the diagnosis and retain the mechanical observations. A unit can still produce electrical output while a mechanical problem develops.
Yes. DENSO identifies excessive drive-belt tension as a cause of internal bearing damage. Do not tighten by feel to silence a noise; apply the vehicle-specific tensioning procedure and investigate alignment, tensioner and pulley condition.
Do not use external spray as a repair or an acceptance test. It does not establish the bearing's internal condition or repair a damaged fit. Preserve the as-found assembly for inspection and follow its specified lubrication and service requirements.
Keep the unit identity, operating conditions, inspection results and photographs of the as-received components. SKF recommends protecting removed bearings and preserving evidence before cleaning. Agree any destructive inspection with the warranty recipient first; do not discard the failed parts while the claim remains open.
Alternator bearing noise should be treated as a localization problem and a failure-chain problem. Record the operating condition, compare neighboring accessories, inspect the belt drive and bracket, check charging behavior, and preserve evidence from the removed unit.
A new bearing will not correct a worn shaft, loose housing, wrong pulley, excessive tension, bracket misalignment, contamination, overload, or collateral electrical damage. Heavy-duty fleets and B2B buyers get better results when they connect the sound to the mechanical load path, electrical demand, operating environment, and exact replacement specification.
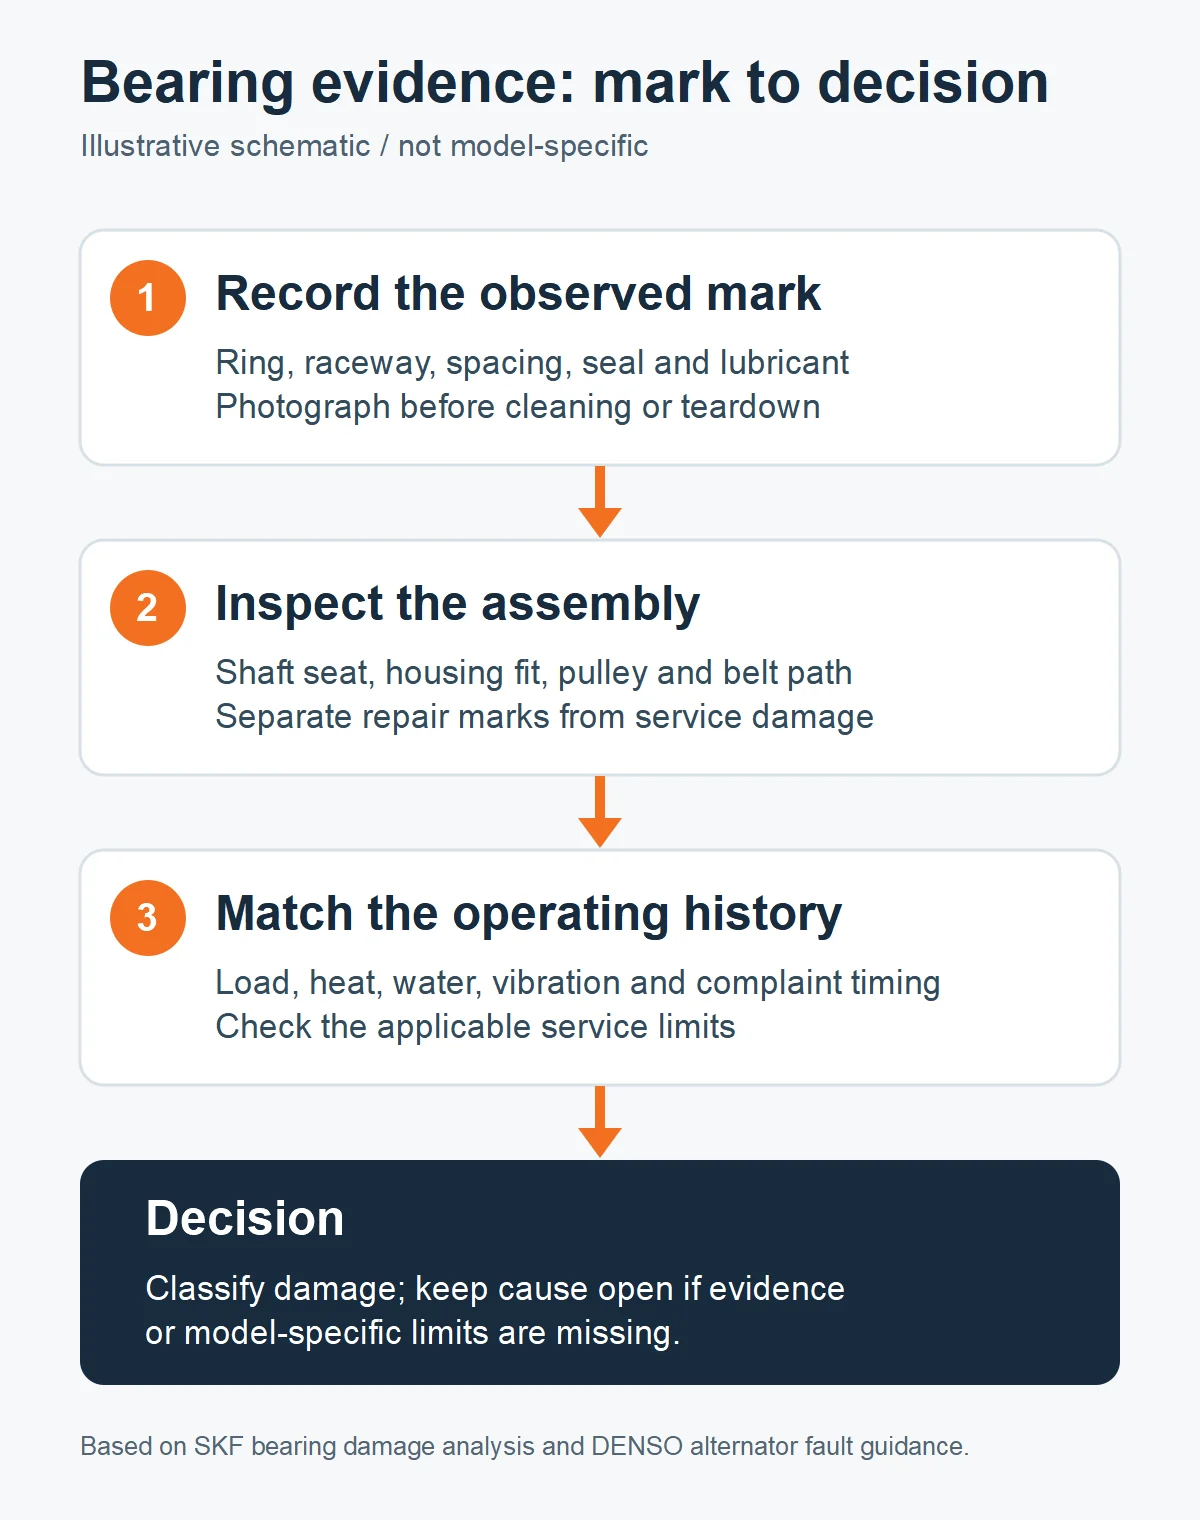
A removed bearing provides a record of what happened at its contact surfaces, but it rarely identifies one cause without the surrounding assembly and operating history. SKF's bearing-damage framework separates rolling-contact fatigue, wear, corrosion, electrical erosion, plastic deformation, and cracking or fracture. These are descriptions of damage, not a shortcut to deciding who supplied a defective part. A fleet return should connect the observed mark to its location, the belt-drive condition, the shaft and housing fits, the environment, and the time at which the complaint appeared.
Illustrative bearing-evidence flow; not a model-specific failure measurement.
Regularly spaced indentations can be caused by an impact or excessive mounting force while the bearing is stationary. Smaller dents associated with particles point instead toward contamination in the rolling contact. Both may later produce surface fatigue, so a photograph taken after extensive operation can show the consequence as well as the initiating event. Record the bearing ring, the side of the raceway, the number and spacing of marks, and the condition of the seal and lubricant before anyone wipes the evidence away.
If the inner ring was pressed onto a shaft, the press tool should have supported that ring under the approved procedure. If the outer ring was pressed into a housing, its force path should likewise have avoided transmission through the balls. This is a general bearing-mounting principle; the alternator service instructions determine the actual fit, temperature method, tool and retention. A new bearing that was forced through its rolling elements can sound rough before it has seen vehicle service.
SKF distinguishes false brinelling from a single overload dent: small oscillations while a loaded bearing is stationary can displace lubricant and create repeated contact marks. A stored or transported alternator can experience vibration without shaft rotation, but that possibility is not proof of the cause in a specific returned unit. Ask how the unit was packed, supported and moved, whether the pulley was restrained, and whether the marks match the rolling-element pitch. Compare the pattern with as-received packaging and shaft-seat evidence before attributing it to storage or shipment.
Reddish debris around a bearing seat may indicate micro-movement between the ring and its shaft or housing rather than water entering the rolling contact. Rust inside a sealed cavity raises a different question about moisture, sealing, washing or storage. Photograph both regions separately. If the seat is polished, enlarged or fretted, replacing only the bearing cannot restore the fit even if the new bearing rotates smoothly by hand.
SKF describes electrical erosion by microscopic craters and, in some cases, a washboard-like pattern that develops after repeated damage. That description does not make every alternator whine an electrical-current bearing failure. A diode or stator fault can produce magnetic noise without those bearing marks, while a damaged bearing can coexist with an electrical fault. If erosion is suspected, have a qualified analyst inspect the surface and then investigate the application-specific electrical path; do not import a variable-frequency motor explanation into a truck alternator without evidence.
The practical value of the classification is a narrower next test. Particle dents call for an ingress and handling review; seat fretting calls for fit measurements; rolling-contact fatigue calls for load, alignment, lubrication and duty review; electrical erosion calls for surface confirmation and a circuit investigation. More than one mechanism can be present. The release decision should address every mechanism capable of causing a repeat failure, not merely the most visible photograph.
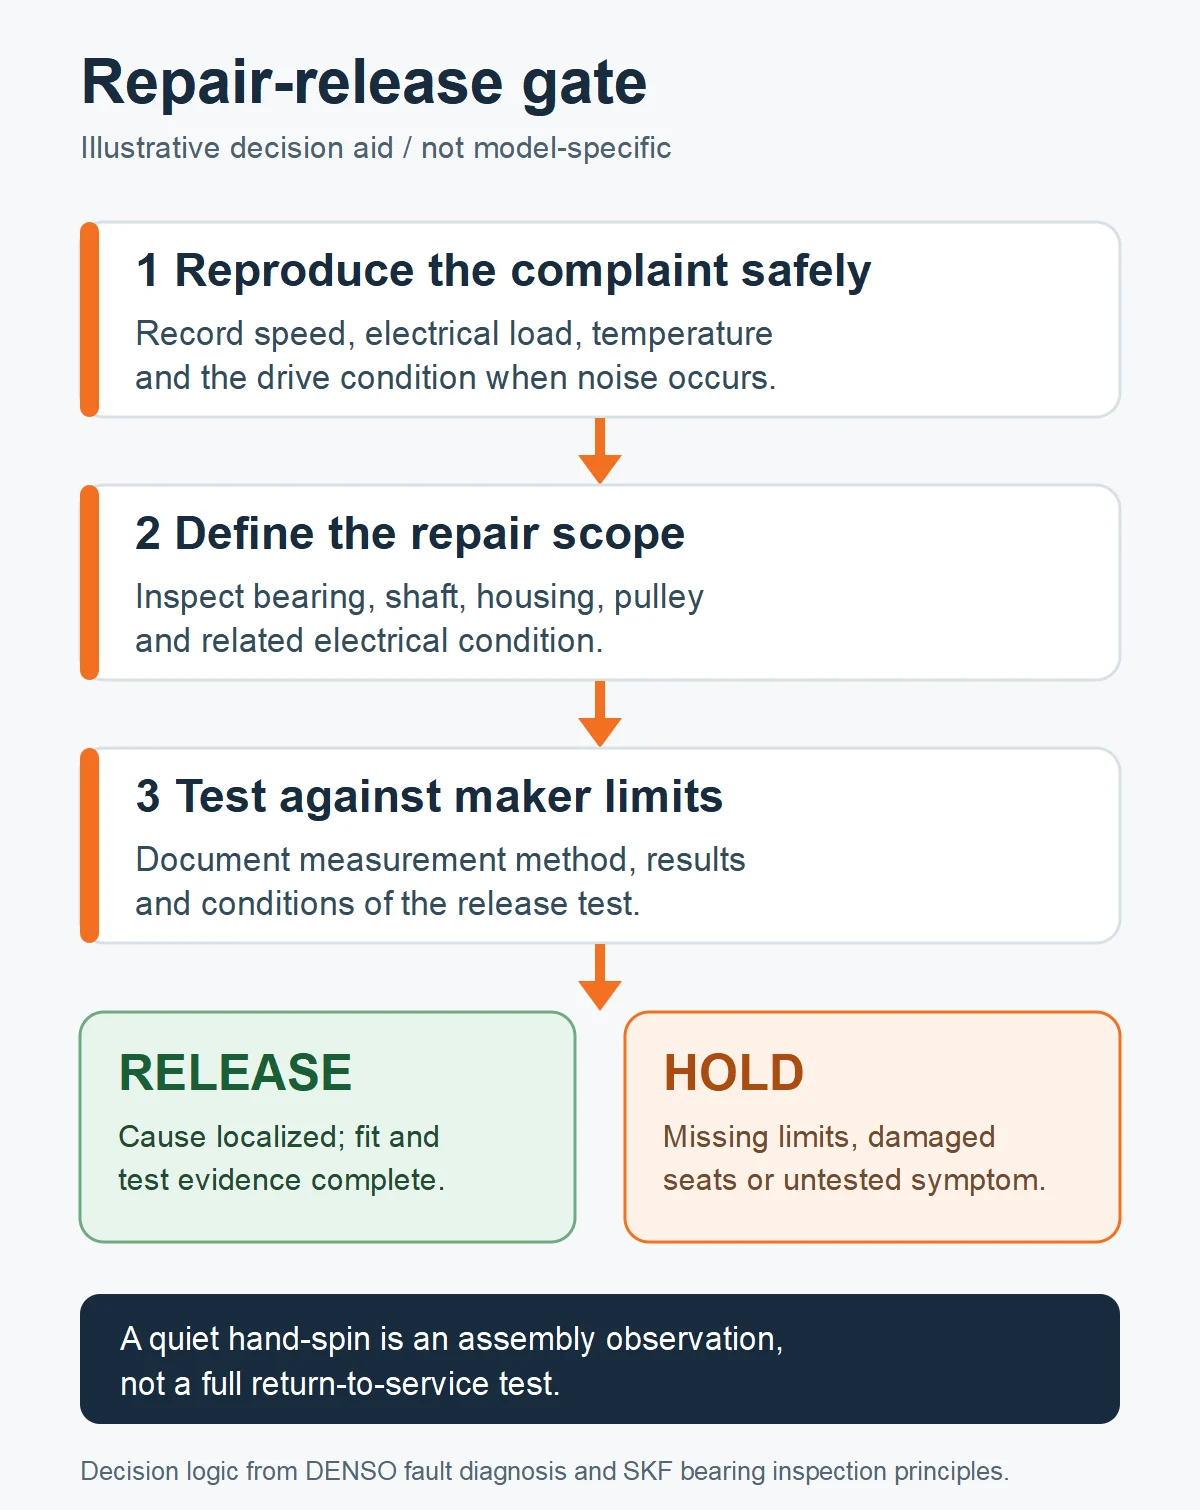
A quiet hand-spin is a useful assembly check but is not a return-to-service test. Before disassembly, document a reproducible complaint under a defined engine speed, electrical load, temperature and belt configuration. After the authorized bearing repair or alternator replacement, repeat the same safe operating condition as closely as practical. A different battery state or accessory load can hide the original noise and make a false pass more likely.
Illustrative release gate; actual acceptance limits depend on the alternator and vehicle service data.
First, did the mechanical source of the noise disappear without abnormal belt tracking, pulley movement or bracket vibration? Second, does the charging system meet the vehicle or alternator maker's requirements at the specified test points and conditions? Third, has the cause that damaged the previous bearing been removed? A repair can pass one question and fail another: a new alternator may charge correctly while a misaligned bracket still loads its front bearing, or the drive can be quiet while a voltage-drop fault remains.
Do not substitute a single cold idle check for a complaint that occurred only hot, wet or under high electrical demand. Record which conditions were reproduced and which were not. If the original condition cannot be safely repeated, state that limit on the job card and keep the result as conditional rather than asserting that the root cause was proven. A later fleet follow-up should compare the same operating state, not an unstructured report of whether the driver heard a noise.
A supplier can act on an exact alternator reference, the removed-unit label, a clear drive-end and rear-end view, and records of belt, pulley, bracket, shaft-seat and electrical checks. The packet should identify which values were measured and which observations were visual. It should also distinguish a verified failed bearing from a suspected bearing-area noise. This prevents a buyer from ordering the same configuration to solve a bracket or belt fault and then interpreting the repeat symptom as proof of poor bearing quality.
For multi-vehicle fleets, compare returns only after grouping by application, alternator configuration, pulley and duty. A few noisy units from different installations do not establish a batch defect. Conversely, repeated damage in one configuration should prompt preservation of units and review of common installation and operating conditions before the lot is released for further use. The decision can be escalated without inventing a failure-rate threshold: document the observed pattern, isolate the affected references, and obtain the maker's inspection criteria.
A bearing replacement addresses a bearing, not every condition that damaged it. Before specifying a repair, inspect the shaft journal and housing fit using the relevant manufacturer's limits. Record fretting at the seat, looseness, visible scoring, and any damage from removal. If those interfaces cannot retain a new bearing correctly, a bearing-only quote may transfer the same failure to a new component. The supplier should state whether the proposal is a bearing service, a rebuilt alternator, or a replacement assembly, and which components and tests are included. A buyer should not infer equal scope from equal part numbers or from a single photograph of a cleaned housing.
A workshop may lack the model-specific limits for shaft runout, bearing fit, or allowable noise. In that situation, record the measured values and the instrument used, then obtain the applicable service specification before calling the assembly compliant. A qualitative observation such as “quiet at idle” is useful as a symptom record but cannot replace the maker's acceptance criterion. If the original complaint occurred only under heat or electrical load, state that the test did not reproduce those conditions and keep the claim open. This protects both buyer and supplier from a false pass.
For a returned lot, compare units by exact reference, pulley arrangement, duty cycle, and installation history before looking for a common cause. One return can trigger inspection; it does not establish a defect rate. Similar marks on several units may suggest a shared installation or operating exposure, but that remains a hypothesis until the bearing surfaces, seats, drive system, and test records are compared. Keep the original photographs and the as-received parts so the next inspection can distinguish pre-existing damage from marks introduced during teardown. Use the resulting evidence to decide whether to release, inspect further, or hold the affected reference; do not invent a universal percentage threshold.
Alternator bearing noise is a symptom to localize, not a stand-alone reason to order a bearing. The useful path is to record the operating condition, exclude neighboring drive components, inspect the removed assembly and its shaft and housing fits, then test the chosen repair against the original complaint. A damaged raceway can narrow the next investigation, but the mark alone does not prove which supplier or operating condition caused it. For fleet and procurement decisions, keep the unit identity, inspection photographs, measurements, service limits and release-test conditions together. If the evidence or model-specific limits are missing, hold the conclusion open rather than declaring a bearing-only repair successful.
Reviewed 8 October 2026. The sources below support the diagnostic principles; they do not supply model-specific heavy-duty bearing tolerances. The repair-release table is an editorial job-card aid, not a manufacturer certification.
DENSO: Diagnosing Alternator Faults the Right Way — symptom-led diagnosis, belt and installation faults.
DENSO: Alternator Troubleshooting — belt tension, electrical checks and manufacturer-specific test values.
SKF: Bearing Damage and Failure Analysis — mounting-force paths, seat condition and evidence preservation.