ELECDURA NETWORK

Your Whole New Supply Chain For Heavy-Duty Parts
Whatsapp:
+86 18915027366
Phone:
+86 18915027366
Views: 0 Author: Site Editor Publish Time: 2026-08-25 Origin: Site
A bench test is useful for receiving inspection, warranty triage, and pre-installation screening of a heavy-duty starter motor. It can show whether a correctly configured unit engages and turns under a controlled supply. It cannot prove that the vehicle battery bank, cables, control circuit, ring gear, or engine will perform correctly in service. Treating those two questions as one is a common cause of unnecessary returns.
Begin by confirming that the proposed unit belongs to the requested application. Elecdurauto’s heavy-duty starter motor catalogue supports matching by OE number, engine, voltage, power rating, rotation, pinion count, mounting, and terminal arrangement. A bench result has little value if it was obtained from a unit that was never physically matched to the removed starter.
The right question is not simply, “Does it spin?” A receiving test should produce evidence that a buyer can compare against the purchase record and the manufacturer’s procedure. With an appropriate test fixture and supply, the inspection may confirm that the solenoid or engagement mechanism reacts as intended, the motor turns without abnormal mechanical interference, and the terminal layout corresponds to the order.
It should not be used to certify vehicle cranking performance, confirm battery condition, or set a universal acceptance threshold. Those outcomes require the specified test method, the correct load condition, and the relevant product documentation. A free-running observation is not equivalent to a loaded performance test.
Keep the report clear by separating identity acceptance from functional observation. Identity acceptance asks whether the label, voltage, output class, rotation, pinion, mounting face, and terminal layout match the quotation. Functional observation records what happened on the approved bench fixture. A unit can pass one statement and fail the other; neither should be silently substituted for the other.
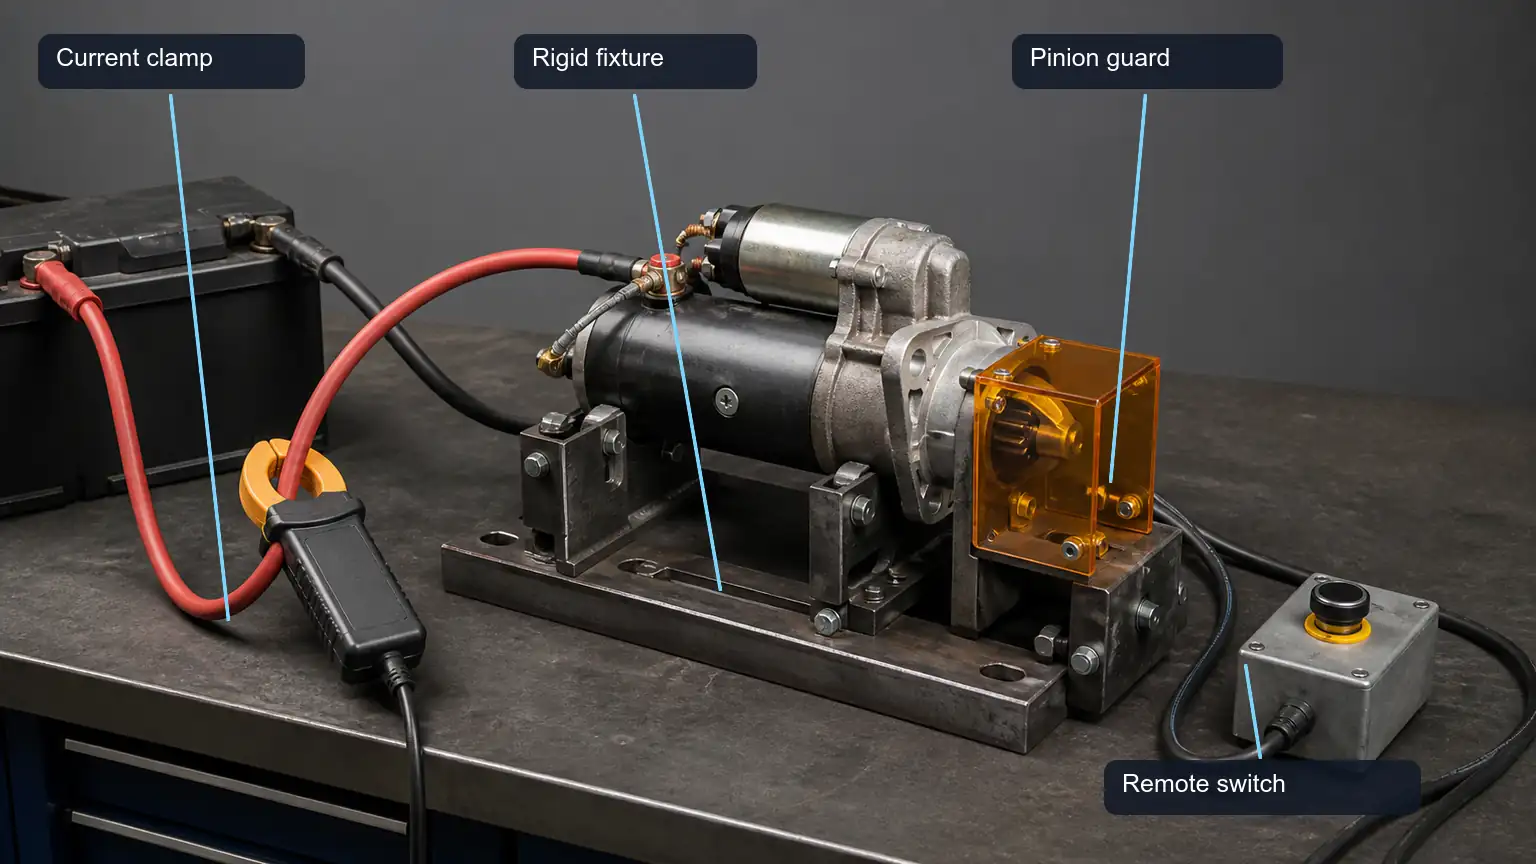
Show a correctly restrained starter, battery supply, remote switch, current clamp, and guarded pinion zone before testing.
A starter can produce high torque and high current. Use a secure fixture designed for the unit, approved high-current cables, correctly rated protective equipment, and the starter manufacturer’s safety instructions. The fixture must restrain the starter and keep the pinion area, moving parts, and terminals away from hands and loose equipment. Do not improvise with light-gauge leads, unsecured blocks, or a battery placed where a short circuit could create a hazard.
Document the power source, nominal system voltage, connection points, cable condition, and test configuration. If the source is unstable or the cables are unsuitable, the bench test may create a false failure. Use a source compatible with the product’s specified voltage and follow the product maker’s instructions for any current, duration, or duty-cycle requirements.
Heavy-duty starter families can differ in nose housing, mounting flange, pinion travel, rotation, and integrated magnetic-switch layout. Confirm that the fixture supports the tested design without contacting or restraining the wrong part of the housing. If the fixture does not support the exact design, stop and use a suitable procedure rather than forcing the unit into an approximate setup.
Photograph the label, drive end, mounting face, terminal side, and pinion. Record the complete part number, any readable cross references, date or batch marking if present, the requested quantity, and the buyer’s application information. This creates a clean chain from the offered part to the specific unit observed on the bench.
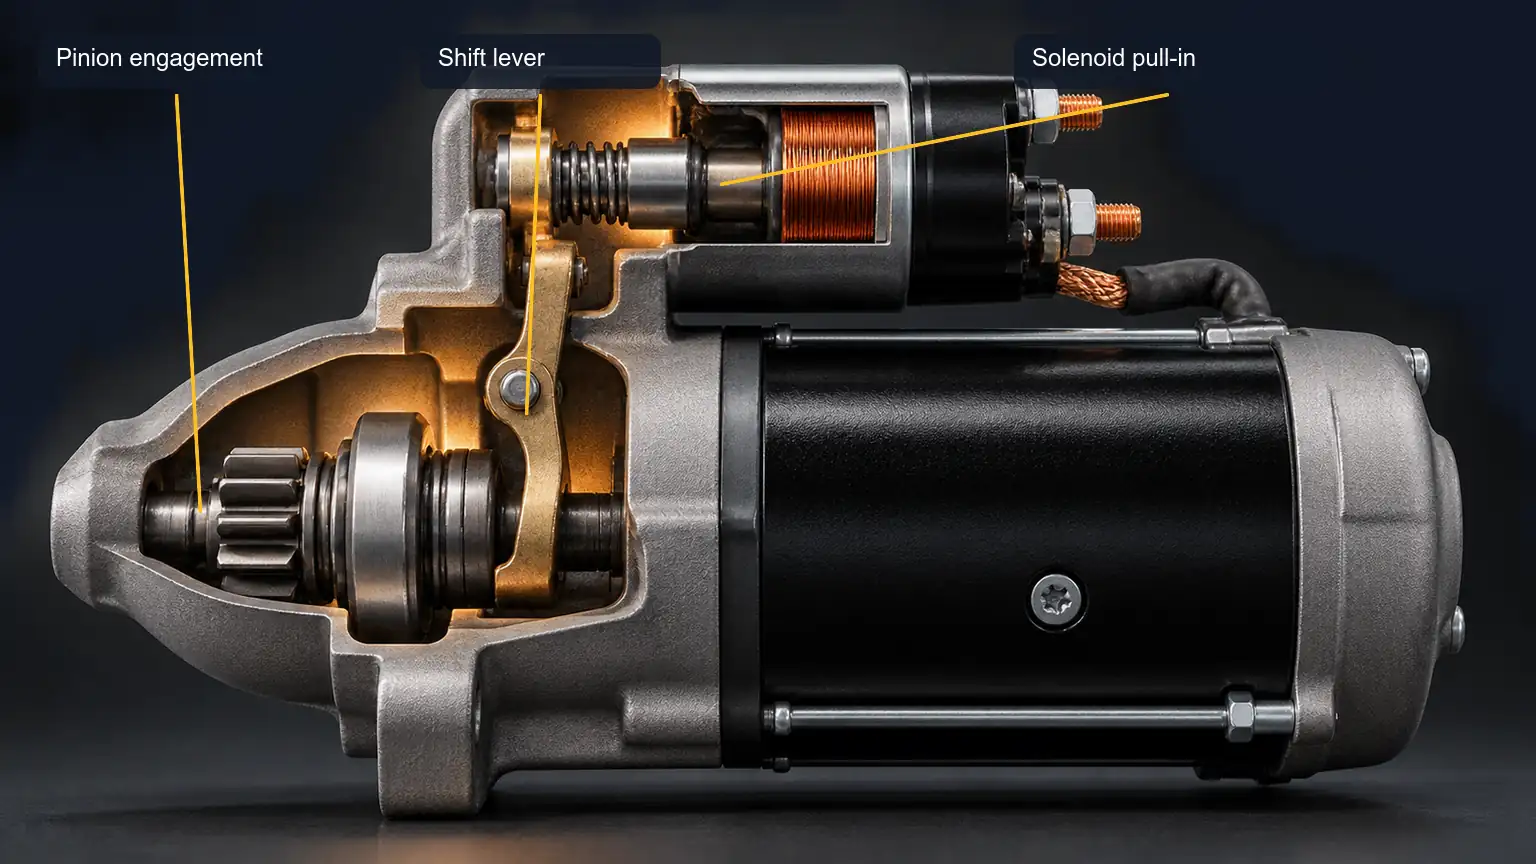
Make the relationship between solenoid movement, shift lever, and pinion engagement visible.
In many heavy-duty designs, the engagement mechanism and motor action are related but not identical. The inspection should observe the sequence specified for that starter design: command applied, solenoid or magnetic switch response, pinion movement where visible and safe to observe, and motor rotation. Do not assume that every starter uses the same engagement arrangement.
A useful record describes what was seen and heard without inventing a diagnosis. For example, “command applied according to the approved fixture; engagement action observed; motor rotated continuously for the approved test interval; no external arcing observed” is better than “perfect starter.” If an unexpected noise, delayed engagement, abnormal vibration, smoke, heat, or intermittent response is seen, stop the test and preserve the finding for technical review.
Long, repeated free-running tests can create damage or misleading results. The permissible duration and rest period belong to the maker’s documentation. A B2B inspection sheet should show the actual test time and any required pause; it should never conceal a repeat test that was performed simply to force a pass.
A starter may rotate freely on a bench and still encounter a vehicle-side problem after installation. Battery state of charge, cable voltage loss, ground bonding, relay or controller command, engine mechanical load, ring gear condition, and installation torque all affect the in-vehicle outcome. Conversely, a no-crank vehicle complaint may be caused by these external conditions even when the starter itself is sound.
After installation, verify the system using the vehicle manufacturer’s procedure. A loaded circuit audit and an inspection of the ring gear, mounting condition, and control path are distinct tasks. The bench report should travel with the work order, but it must not replace an in-vehicle voltage-drop or command-circuit check when the symptom requires one.
For a distributor, this distinction helps prevent dispute escalation. Supplier evidence may include the order specification, incoming inspection photos, and approved bench observation. Field evidence may include battery test data, vehicle voltage-drop results, fault codes where applicable, installation photographs, and the returned unit’s condition. Combining them in one traceable record is stronger than assuming one data point proves every failure mode.
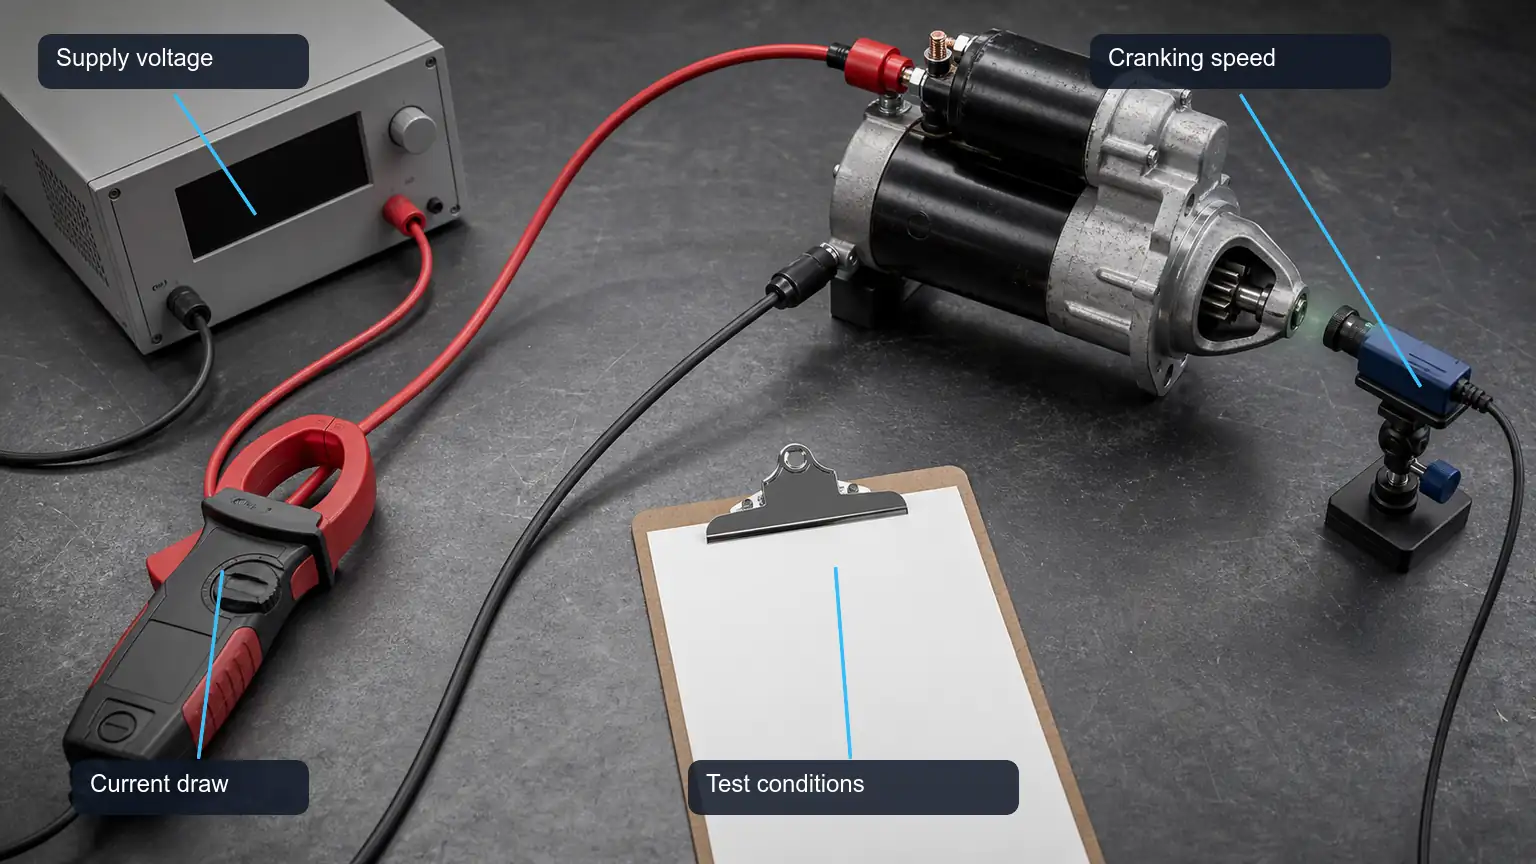
Show that a test decision requires multiple readings, not a single current figure.
A good receiving card should be short enough to complete consistently and detailed enough to support an exception. It can include the following sections:
purchase order, supplier, receiver, and date;
customer part number, old-unit reference, engine or equipment identity, and quantity;
voltage, rated output when supplied, rotation, pinion count, mounting style, and terminal arrangement;
test fixture identifier, source configuration, operator, and applicable maker procedure;
functional observation, photographs, decision, and escalation owner.
This format creates a usable distinction between a configuration mismatch and an observed functional concern. It also helps a procurement team identify recurring problems by product family rather than collecting unstructured comments such as “starter did not work.”
If the physical identity does not match the approved order, quarantine the unit before electrical testing. If identity matches but the prescribed bench observation is abnormal, retain the test record and request technical review. If the unit passes the controlled observation, install it only after vehicle-side compatibility and wiring conditions have been checked. This sequence reduces both safety risk and avoidable reverse logistics.
For repeat fleets and distributors, the order specification should include more than a broad vehicle name. Provide engine data, complete old-unit markings, voltage, kW or output rating if known, pinion count, rotation, mounting-face images, terminal-side images, expected quantity, destination, and target delivery date. These details help distinguish units that share an engine family but differ in drive, flange, or electrical layout.
For a new sourcing program, use the Elecdurauto supplier overview to understand the B2B matching approach, then send the complete application and sample information through the quotation contact page. The purpose is not to promise a match from a photograph alone; it is to give the supplier enough evidence to verify the required configuration.
Incoming inspection should also confirm label readability, protective packaging, terminal protection, and whether the carton can be linked to the unit tested. A mechanically sound starter that arrives with unprotected terminals, a damaged mounting face, or an untraceable label still creates a B2B service risk. Capture that condition before it becomes an installation dispute.
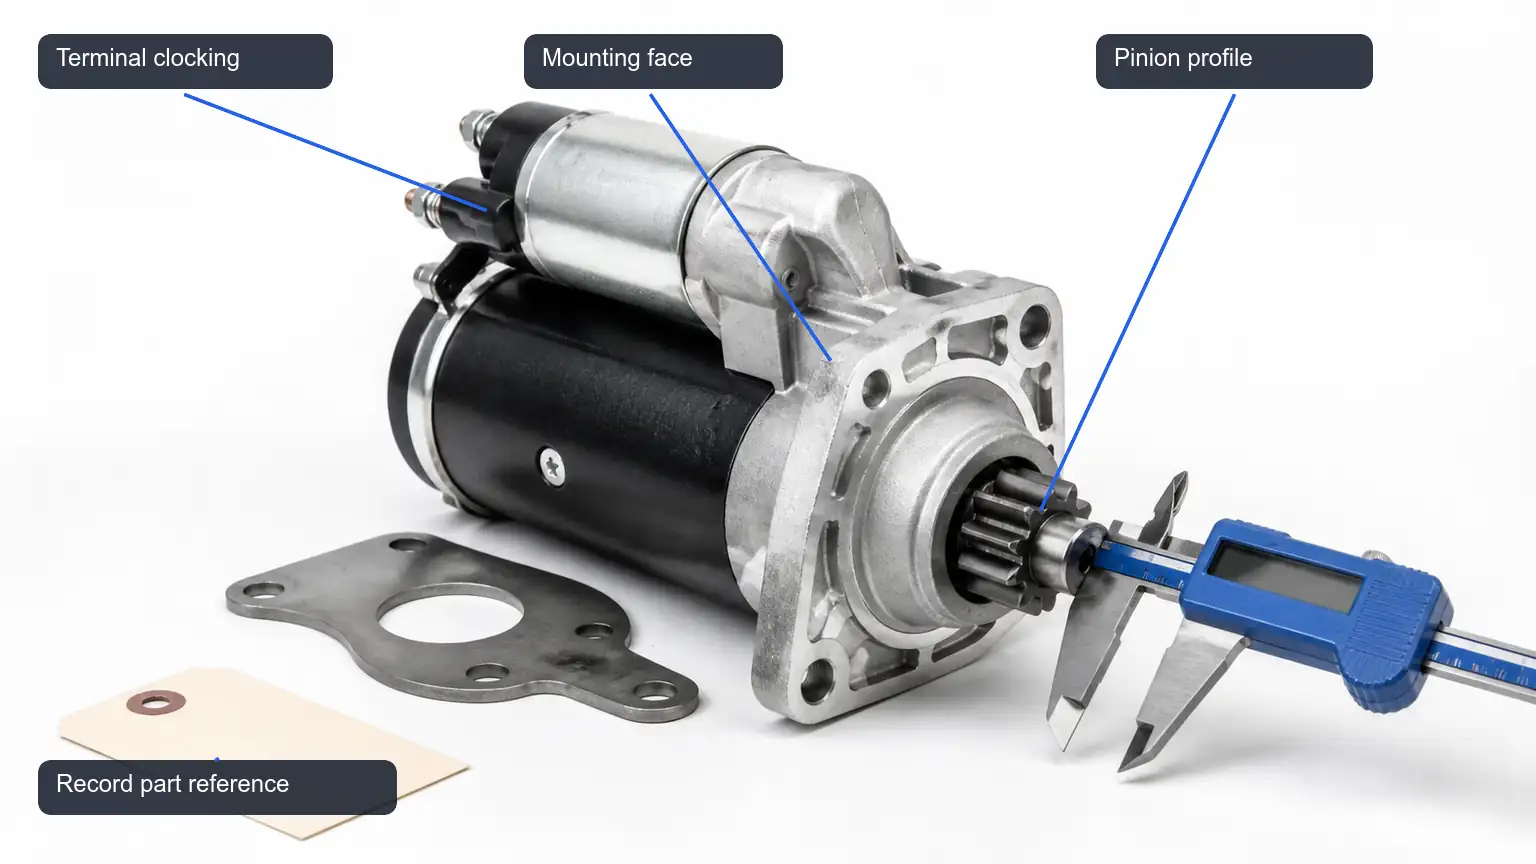
Support B2B buyers checking mounting face, terminal type, pinion, and clocking before a bench test or installation.
A bench fixture can make a starter look functional even if its configuration is wrong for the intended flywheel housing. Before connecting power, compare the drive-end profile, mounting-hole count and geometry, locating diameter where applicable, pinion tooth count, direction of rotation, terminal placement, and overall clearance features with the removed unit and approved application information.
Inspect the pinion teeth, stop collar, return mechanism, nose housing, and any visible shift components for transit damage or handling marks. Do not force the pinion by hand against a design that is not intended to be manually moved. The purpose of the visual check is to identify obvious damage and confirm that the observed unit matches the ordered configuration, not to disassemble it without authorisation.
Two starter listings can share a broad OE family while using different output ratings, tooth counts, nose lengths, or solenoid orientations. This is especially common when an engine family spans trucks, industrial equipment, agricultural machines, or regional variants. A buyer should record the complete removed-unit label and physical views before treating a partial number as a complete match.
Take one image of each required view against a consistent background: label side, drive end, mounting face, terminal side, and overall unit. Include a scale or measured drawing only when it is appropriate and accurate. Uncontrolled images that obscure the terminal layout or drive end are not enough for an application-critical decision.
An unclear result is not a reason to repeat the same energising action until the unit appears to behave normally. Stop the test, mark the unit, retain the exact setup information, and escalate with the observation. The next step may be a different approved fixture, a component-specific procedure, a supplier technical review, or a controlled teardown authorised by the responsible party.
A hold tag should identify the part, purchase order, observation date, operator, and reason for the hold. Keep the starter separated from approved stock and prevent it from being fitted while the review is open. This simple control is important for distributors who process similar-looking units from multiple suppliers or maintain mixed inventory across several applications.
When sharing evidence with a supplier, ask for configuration confirmation or technical review rather than asking the supplier to diagnose a vehicle from a short video. The vehicle manufacturer’s procedure governs field repair. The supplier’s matching review can help determine whether the starter reference, mounting, electrical specification, and ordering data are consistent with the request.
For larger programs, define who approves first articles, who reviews a functional exception, which fields must be captured from each lot, and how cartons are tied to accepted units. Consider whether the agreement calls for a first-article check, a sample-based check, or a unit-by-unit record. The inspection scope should be written before delivery rather than invented after a field complaint.
Keep the bench observation, physical matching photographs, packaging evidence, and later field feedback in one accessible file. That gives a procurement manager a usable picture of a product family’s performance without making a bench screen appear to be a full durability or vehicle-fitment test.
When the starter leaves receiving inspection, attach or store the part identity, approved application, bench observation, and outstanding vehicle-side checks with the work order. The installation team then knows that the unit was screened, but still has to inspect the ring gear, mounting condition, battery bank, cables, and command circuit. This handover prevents the phrase “bench-tested” from being interpreted as “vehicle proven.”
If a post-install complaint occurs, return to the documented sequence. Compare the installed unit with the incoming photographs, verify the vehicle-side circuit under load, and inspect the removed part only under the approved process. This protects the evidence chain and reduces avoidable arguments over whether the original unit, the supplied unit, or the vehicle condition caused the problem.
Where a workshop uses a dedicated starter tester, keep the fixture maintenance record available. Worn clamps, damaged cables, unsuitable adapters, or a poor supply connection can change the observed behaviour before the starter is even evaluated. The fixture identifier in the report should point to a maintained piece of equipment, not just a generic note that a bench was used. This is especially important when one facility tests both 12 V and 24 V commercial units.
A pre-installation screen should also capture whether the unit arrived as new, remanufactured, or an OE-grade aftermarket replacement, using only the actual order description. Do not infer origin or product status from paint colour, label style, or carton artwork. The order reference, supplier paperwork, physical label, and approved specification should agree before the test result is applied to an acceptance decision.
For units that will be stocked rather than installed immediately, store the test record with the location and carton identifier. A starter can be moved between warehouses, branches, or technicians long after its initial inspection. Traceability at this stage allows a distributor to find the exact unit and its evidence without re-energising an unknown starter simply because the original receiving file was lost.
The test operator should be authorised to stop the process when the fixture, test source, or unit configuration is uncertain. A clearly recorded “not tested—fixture or identity pending” outcome is more useful than a doubtful pass. It protects people, avoids damaging a saleable part, and tells the purchasing team what information is still needed from the application or supplier.
For export programs, make the inspection record readable to the receiving market. Preserve the original part number and technical identifiers, but pair them with clear English field labels for voltage, rotation, mounting, terminal arrangement, test status, and hold reason. A consistent record reduces transcription errors when cartons, warehouse systems, and customer service teams use different languages or reference formats.
Before a controlled test begins, verify that the operator understands the exact starter design and the emergency shutdown method for the fixture. Heavy-duty units differ in weight, engagement arrangement, and terminal layout, so an experienced operator should not rely on habit from a smaller automotive starter. The approved test setup should identify where the unit is restrained, where the power is isolated, and which movement or sound requires an immediate stop.
When an incoming unit is held for further review, attach the reason to both the physical tag and the warehouse record. A carton stored without a visible hold status can be mistakenly issued to a technician under time pressure. Clear physical and digital status control is a simple way to prevent an unapproved unit from reaching a vehicle before the technical review is complete.
A properly documented bench test helps a heavy-duty buyer screen a starter before installation and organise warranty evidence if an issue appears. Its strongest value comes from disciplined identity matching, a compatible fixture, an approved procedure, concise observations, and a clear boundary between bench results and vehicle diagnosis. That approach supports accurate sourcing without making claims that the test cannot prove.