ELECDURA NETWORK

Your Whole New Supply Chain For Heavy-Duty Parts
Whatsapp:
+86 18915027366
Phone:
+86 18915027366
Views: 0 Author: Site Editor Publish Time: 2026-08-25 Origin: Site
A replacement turbocharger can fail again if the lubrication fault that damaged the original unit remains in the engine. The oil feed line deserves focused inspection because it carries pressurised oil to the turbocharger bearing system, yet it is often treated as a small accessory instead of a critical part of the repair. A sound inspection distinguishes a feed-line restriction from a drain-path problem, an oil-quality problem, or an engine-pressure problem before the new unit is installed.
Part matching still comes first. The heavy-duty turbocharger category supports commercial sourcing by application and part identity, but the incoming unit must be matched by the correct OE or reference number, engine, housing configuration, actuator arrangement where applicable, and installation hardware. An accurate replacement cannot correct an unresolved lubrication cause.
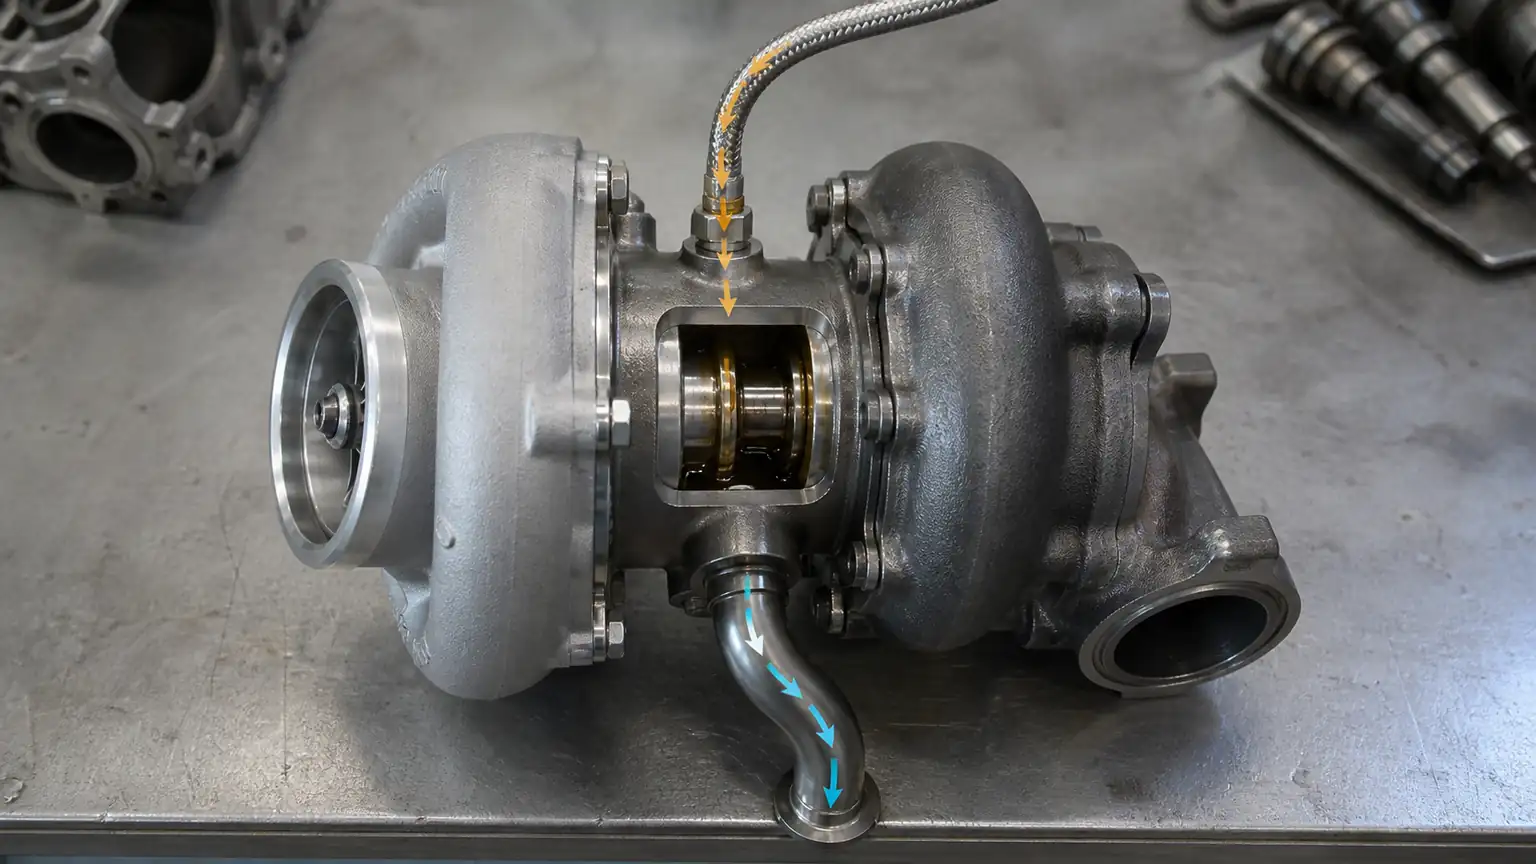
Show how oil reaches the turbo bearing housing and why feed and return restrictions have different symptoms.
Before removing lines or cleaning evidence, collect the engine and equipment identity, old turbo label, work order, oil-service history, prior turbo replacement history, driver complaint, fault records where applicable, and photographs of the complete installed assembly. Note whether the complaint involved noise, low boost, smoke, oil consumption, oil in charge-air plumbing, a sudden power loss, or repeated failures. These symptoms can overlap, so they should not be used as a diagnosis by themselves.
The feed line delivers pressurised oil into the turbocharger. The drain line returns oil from the center housing to the engine. A blocked or damaged feed line can starve the bearing system. A restricted drain path can allow oil to back up in the center housing and contribute to leakage symptoms. The two paths are related but they are not interchangeable, and their inspection records should name the path being evaluated.
Ask what could have changed before the failure: an extended oil interval, engine repair, contaminated oil, a damaged hose, a collapsed internal liner, sealant debris, a modified fitting, a new exhaust or intake restriction, or an oil-pressure complaint. The goal is not to assign blame from one photograph. It is to identify conditions that would put the replacement into the same damaging environment.
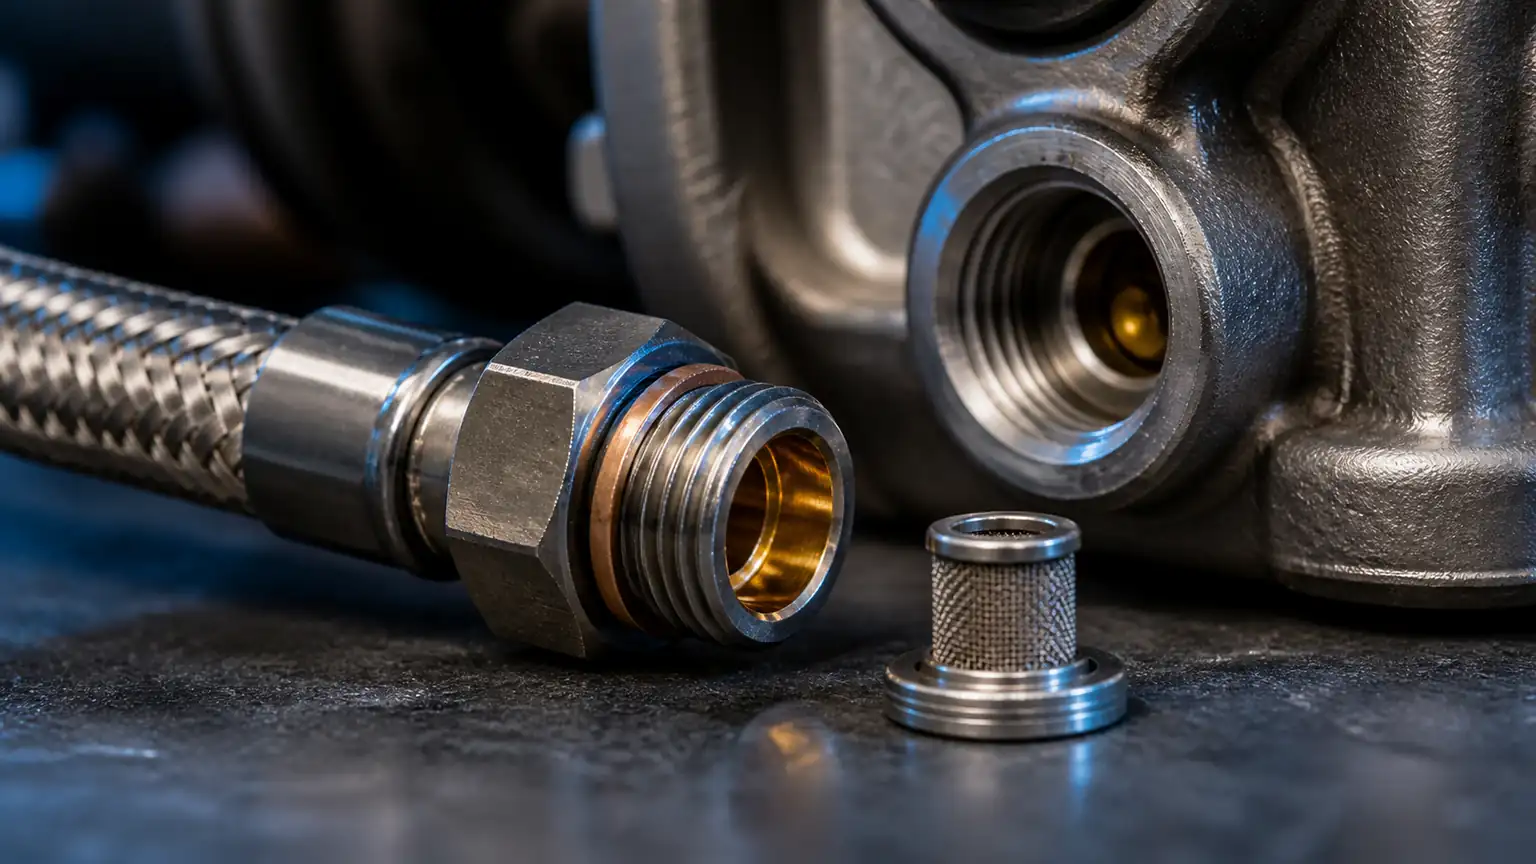
Show the small interface features that can block delivery or introduce debris.
Begin with the original routing. Check whether the line is kinked, crushed, heat-damaged, chafed, unsupported, or forced into an unnatural bend. Examine fittings for thread damage, incorrect adapters, overtightening marks, missing seals, and evidence of sealant that could migrate into the oil path. An external oil leak and an internal restriction may exist independently, so neither observation eliminates the need for the other.
The line is only one section of the oil supply route. Review the engine-side connection, any banjo bolt or metering fitting specified by the engine maker, filter housing route, turbo-side fitting, and the turbocharger’s oil inlet. Use the exact engine and turbo documentation before removing or changing a restrictor, fitting, or screen. A component that looks like a generic fitting may be a calibrated part of the original oiling design.
Photograph the fittings, suspected deposits, damaged protective sleeve, and any foreign material before cleaning. Label the removed line to preserve orientation. If a supplier, remanufacturer, or warranty team must review the case, a clear before-and-after record is more useful than a statement that the line was “checked.”
Do not use compressed air, wire, drill bits, or improvised solvents unless the engine and line manufacturer explicitly approves the method. Those actions can damage the line, leave debris, or change a controlled restriction. Follow the prescribed inspection or replacement instruction for the exact application. If the line cannot be confidently verified, document the uncertainty and resolve it before installation.
The feed line cannot deliver clean oil if the engine’s lubrication system is compromised. Review the oil and filter condition, maintenance interval, any known fuel or coolant contamination, and the specified oil pressure checks. Do not state that a turbo failed from oil starvation merely because oil is dark or the bearings show damage; use the engine maker’s diagnostic path and preserve the complete evidence set.
Contaminated oil can abrade precision bearing surfaces even when supply pressure exists. A restriction may reduce available oil volume or delay delivery even if the oil looks acceptable. These failure mechanisms can coexist, and the repair plan should address every confirmed cause. Fresh oil alone will not correct a collapsed line; a new line alone will not correct contaminated oil or an underlying pressure problem.
Turbocharger symptoms can also be influenced by intake restriction, charge-air leaks, exhaust restriction, abnormal crankcase pressure, or actuator control faults. Include these checks in the root-cause record where the vehicle procedure requires them. The feed-line inspection is deliberately specific, but it must remain part of a complete turbocharger diagnosis.
Before fitting the replacement, verify the kit contents against the order and the manufacturer’s procedure. Keep old and new components separate until all identifiers and hardware have been photographed. Confirm gasket and fitting requirements, line routing, clean-oil requirements, priming steps, torque values, and any calibration or actuator requirements from the relevant documentation.
A short sign-off can reduce repeat damage. Include the old turbo reference, new turbo reference, engine identity, feed-line status, drain-path status, oil and filter service status, documented pressure check where required, intake and exhaust findings, hardware used, and person responsible for the final inspection. This is especially useful when a distributor supplies a unit to a remote workshop or fleet branch.
For B2B buyers, retain carton labels, product labels, installation-kit identifiers, and a photograph of the new unit before it is installed. If the product must later be reviewed, the evidence should show whether the correct turbocharger and supporting hardware were used. A lost label makes it harder to distinguish an application mismatch from a service-related problem.
When asking for a replacement or quotation, provide the OE number or complete old-unit label, engine and equipment details, compressor and turbine housing photographs, actuator or control details, mounting images, feed and drain condition, required quantity, destination, and timing. This evidence enables a supplier to discuss an OE-grade aftermarket replacement with the right physical and application context.
For a quote or technical matching review, use the Elecdurauto heavy-duty parts contact page. The inquiry should identify confirmed findings and open questions separately. A precise request is more useful than a broad instruction to “send the same turbo,” particularly when a product family has several closely related housings or actuators.
If a fleet sees repeated feed-line damage on a single platform, group the records by engine, routing location, operating environment, and service history. The pattern may identify heat exposure, vibration, maintenance contamination, or an installation process that needs correction. Preventive action is more valuable than replacing the same turbocharger repeatedly.
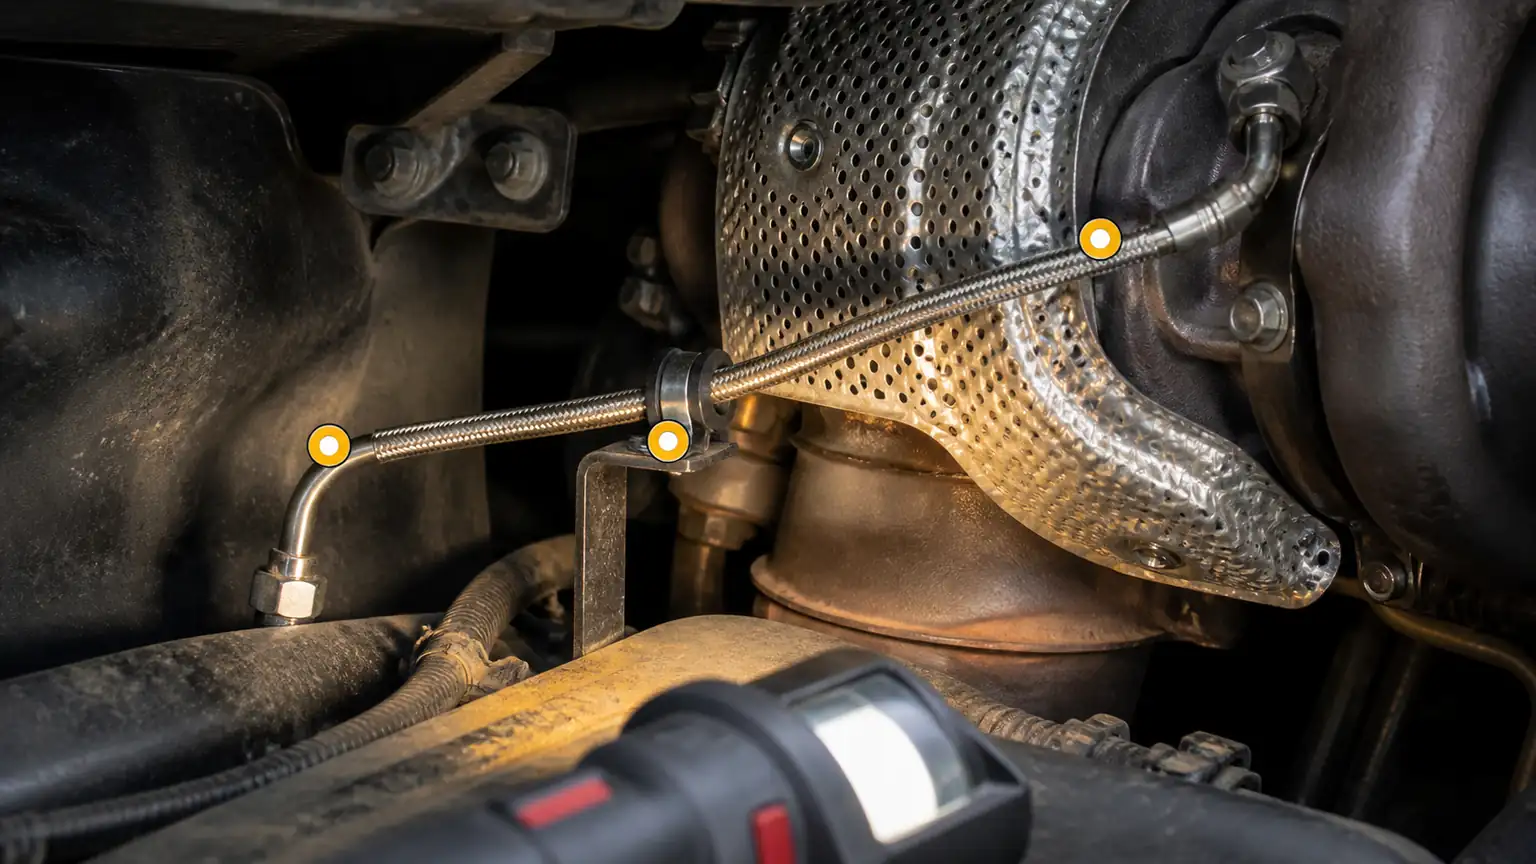
Support a practical line inspection sequence from engine supply point to turbo inlet.
A complete root-cause check should be broad enough to prevent repeat failure but specific enough to preserve the value of the feed-line inspection. Review the oil filter and its installation, the condition of removed oil where an approved sampling process exists, the engine’s specified pressure test results, and the turbocharger inlet condition. Record which findings are confirmed, suspected, or not assessed. That language is more useful than presenting a broad list of possible causes as a diagnosis.
Because a restricted drain can contribute to smoke or oil leakage, inspect its routing, kinks, sealing surfaces, and connection points according to the engine procedure. Do not describe a drain-path concern as oil starvation unless the evidence supports that conclusion. Keeping the feed and drain records separate lets a technical reviewer see whether the replacement was exposed to low supply, poor return, or both.
Open oil lines and turbo ports should be protected from dirt, shop debris, rag fibers, and unapproved sealants. Use clean, compatible caps or covers while the work is paused, then remove them in a controlled way before assembly. Any material introduced during installation can undermine an otherwise careful inspection, especially in a precision lubrication path.
Gaskets, sealing washers, restrictors, and fittings may look interchangeable across turbocharger families while differing in material, geometry, or intended application. Match each item to the correct part list and retain its package identifier when the program requires traceability. A generic repair-kit choice can change the oil path or create a leak even when the turbocharger itself is correct.
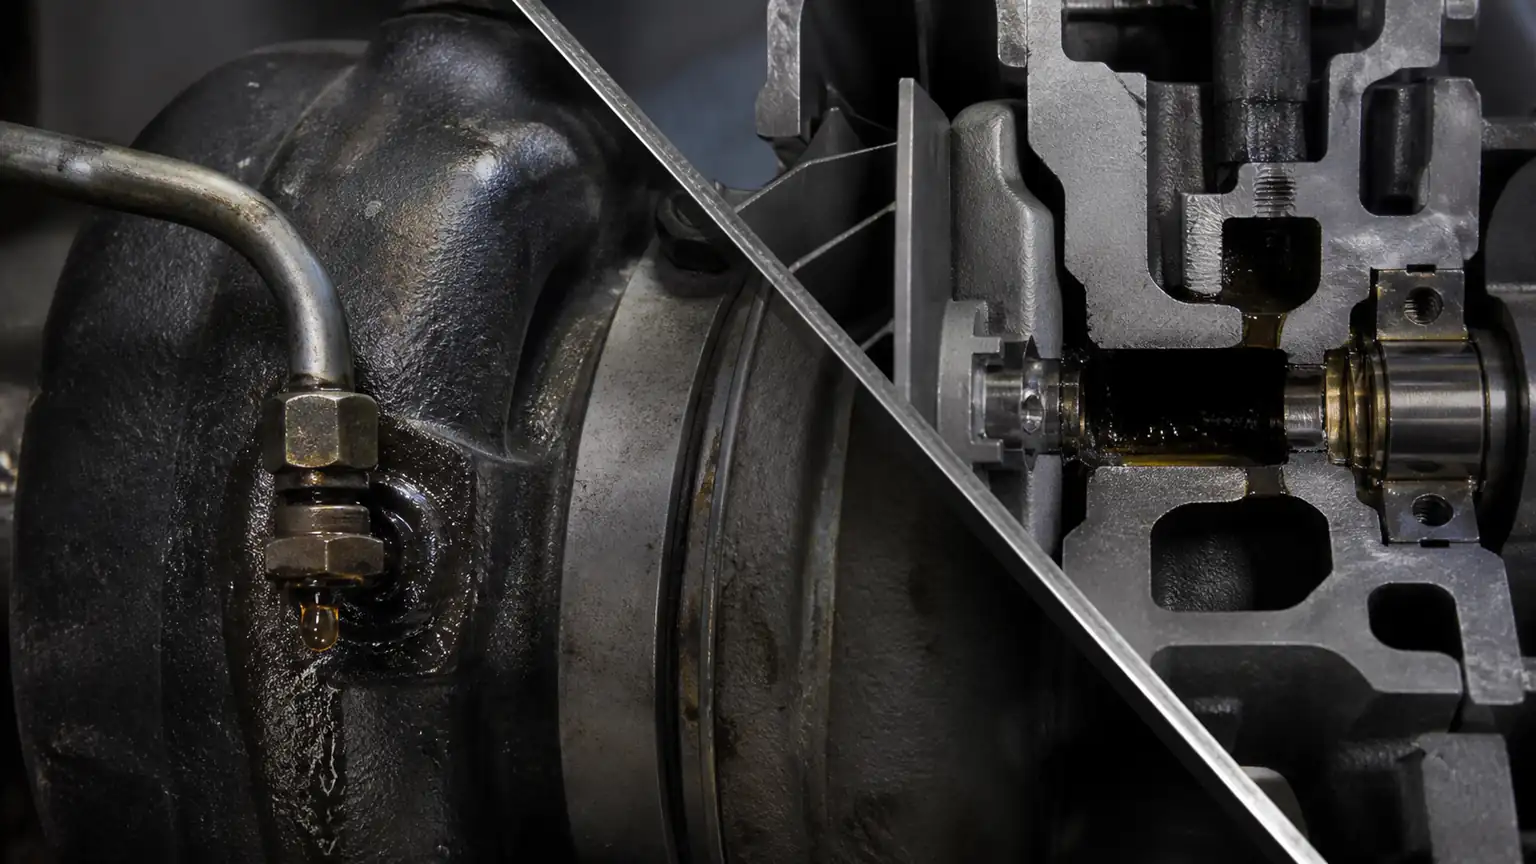
Prevent buyers from treating all oil around a turbo as the same failure mode.
Installation should end with the exact engine and turbocharger commissioning procedure, including any required priming, initial start process, leak checks, and post-install inspection. Do not write a one-size-fits-all prime sequence into a procurement record; different designs and engine manufacturers may specify different steps. Record that the procedure was followed, who performed it, and any unusual observation during first operation.
After the approved commissioning step, inspect for external oil leaks, unusual noise, loose hardware, interference, and abnormal smoke or fault indication according to the service process. If a concern appears, stop and return to the diagnosis instead of continuing to operate the engine in the hope that the symptom will settle. Preserve the new unit’s identity and the relevant installation evidence before any correction is made.
A warranty review package is strongest when it has a defined order: machine identity, old-unit label, complaint, photos before removal, feed-line and drain findings, oil and filter evidence, specified tests performed, new-unit label, installation-kit evidence, and post-install result. Include dates and responsible parties. This structure is valuable even when the outcome is not a product defect, because it helps the fleet prevent a second failure.
For a distributor, the same package also protects the supplier relationship. It avoids the opposite mistakes of blaming every damaged turbo on installation and accepting every visual complaint as a component failure. The evidence can support a fair, application-specific technical review.
Oil feed lines live close to exhaust heat, vibration, and service access points. Review clips, brackets, protective sleeves, and clearance from hot surfaces. A line may be technically intact at the time of inspection but vulnerable because it is unsupported or rubbing against a sharp edge. Document the route from the engine supply point to the turbo inlet so future servicing does not reinstall it under tension or in the wrong orientation.
Previous engine work can introduce non-original fittings, altered hoses, added sealant, or a re-routed line. These changes should be compared against the applicable engine and turbocharger documentation rather than judged by appearance alone. If a modification cannot be confirmed, mark it as an open technical issue. A replacement turbo should not be installed on an unverified lubrication layout simply because the engine has run that way before.
A damaged flare, distorted washer, or loose union can explain an external leak, but it does not automatically explain bearing damage. Likewise, a clean fitting does not prove adequate internal flow. Keep the external sealing finding and the internal supply-path assessment as separate entries in the report. This prevents one visible defect from ending the root-cause investigation too early.
When sourcing a turbocharger for an engine that has experienced a lubrication-related failure, note whether a feed line, drain line, gaskets, fittings, or oil-service items are required by the confirmed service procedure. The supplier should not guess which supporting parts are needed from the turbo part number alone. A complete request helps the buyer plan the correct kit and avoids delaying the repair after the vehicle is already opened.
For a distributor handling multiple regions, include the application, machine serial information where relevant, old-unit label, photos, expected order volume, destination, packaging need, and installation evidence requirement. These details make the order more traceable and help distinguish a routine replacement from a repeat-failure investigation.
Where the engine maker specifies an oil-pressure test point or inspection sequence, keep the result with the turbocharger repair file. A pressure value without its test location, engine condition, and procedure reference has limited meaning. The same is true for an oil sample: if the program takes one, identify the sampling method and timing. These records support a root-cause review without allowing a single observation to be overstated.
Pay attention to the line’s service history. A feed line that was previously bent to clear an accessory, reused after a turbo failure, or fitted with a non-original adapter deserves review even if it is not visibly leaking. The correct response depends on the exact application and manufacturer guidance. The important point is to document the condition and avoid treating a modified line as automatically equivalent to the original design.
Before approving a shipment for a repeat-failure repair, agree who will verify the supporting parts and who will perform the final installation review. A supplier can verify the offered turbocharger and matching information, while the engine or fleet service team owns the vehicle-specific lubrication and commissioning procedure. Defining those boundaries in advance reduces the risk that a B2B quotation is mistaken for a complete repair plan.
For high-value or remote equipment, include a simple evidence-transfer checklist with the delivery. It can request old-unit photographs, feed and drain findings, oil-service confirmation, fitting and gasket identification, and final installed views. This is not a substitute for the manufacturer procedure; it is a practical way to make sure the technical information needed for a future review does not disappear once the machine returns to service.
If the repair is performed away from the buyer’s main facility, assign one person to collect and label the evidence before the old components are discarded. Remote workshops often have limited time once the machine is back in service, so the record must be captured at the repair point. This supports a technical review later without asking the operator to reconstruct the route, fittings, or oil-service details from memory.
Keep the old line separate from scrap until the documented review is closed. Its routing, fittings, and visible condition may be the only remaining evidence if a repeat complaint is reported after the machine leaves the workshop.
A turbocharger oil feed line is a functional part of the engine lubrication system, not a disposable visual detail. Inspect its route, fittings, interfaces, and documented condition alongside oil quality, engine supply, drain path, and air-system context. A complete root-cause record helps a heavy-duty buyer select the right replacement and gives the installation team a better chance of preventing a repeat oil-starvation failure.