Your Whole New Supply Chain For Heavy-Duty Parts
Whatsapp:
+86 18915027366
Phone:
+86 18915027366
Views: 0 Author: Site Editor Publish Time: 2026-09-01 Origin: Site
A new turbo whistle under load is a reason to inspect the air and exhaust systems, not an automatic reason to replace the turbocharger. Escaping charge air, a pre-turbine exhaust leak, loose connections and turbocharger damage can produce overlapping symptoms. The useful distinction comes from locating the source and checking the component under the correct conditions. Record when the sound occurs, preserve any related diagnostic information, and arrange an engine-specific inspection. If there is suspected wheel contact, severe oil loss or another serious warning, stop the diagnostic run and follow the manufacturer's safety procedure rather than trying to reproduce the noise.
This guide is for fleet workshops and heavy-duty parts buyers handling a newly reported whistle, especially when a purchase request already says “turbo failure.” It explains which findings justify a hose, joint or complete-turbo repair. The heavy-duty turbocharger category becomes relevant once a replacement assembly has been identified; a sound recording alone is not a sufficient specification.
On the air side, inspect the path carrying compressed air from the compressor outlet toward the engine. On the exhaust side, distinguish connections before the turbine from those after it. Those locations are not interchangeable, and an inspection note that says only “leak near turbo” leaves the repair scope unresolved.
Area to investigate | Finding that helps locate the problem | What that finding does not establish |
|---|---|---|
Charge-air pipe, hose or cooler connection | Damage or leakage localized by the applicable inspection or test | Whether the turbo's rotating assembly is healthy |
Exhaust connection upstream of the turbine | A joint defect and supporting exhaust-leak evidence | That a charge-air leak is absent elsewhere |
Turbocharger assembly | Confirmed wheel damage, housing contact or an out-of-spec condition assessed by the correct method | The cause of the damage or the correct replacement reference |
The table is an investigation map, not a symptom-to-part lookup. Garrett's turbo diagnostics guidance directs attention to pipework, brackets, connections and the intercooler when investigating noise. That external inspection is important because changing the turbo will not repair a leaking connection left in the vehicle.
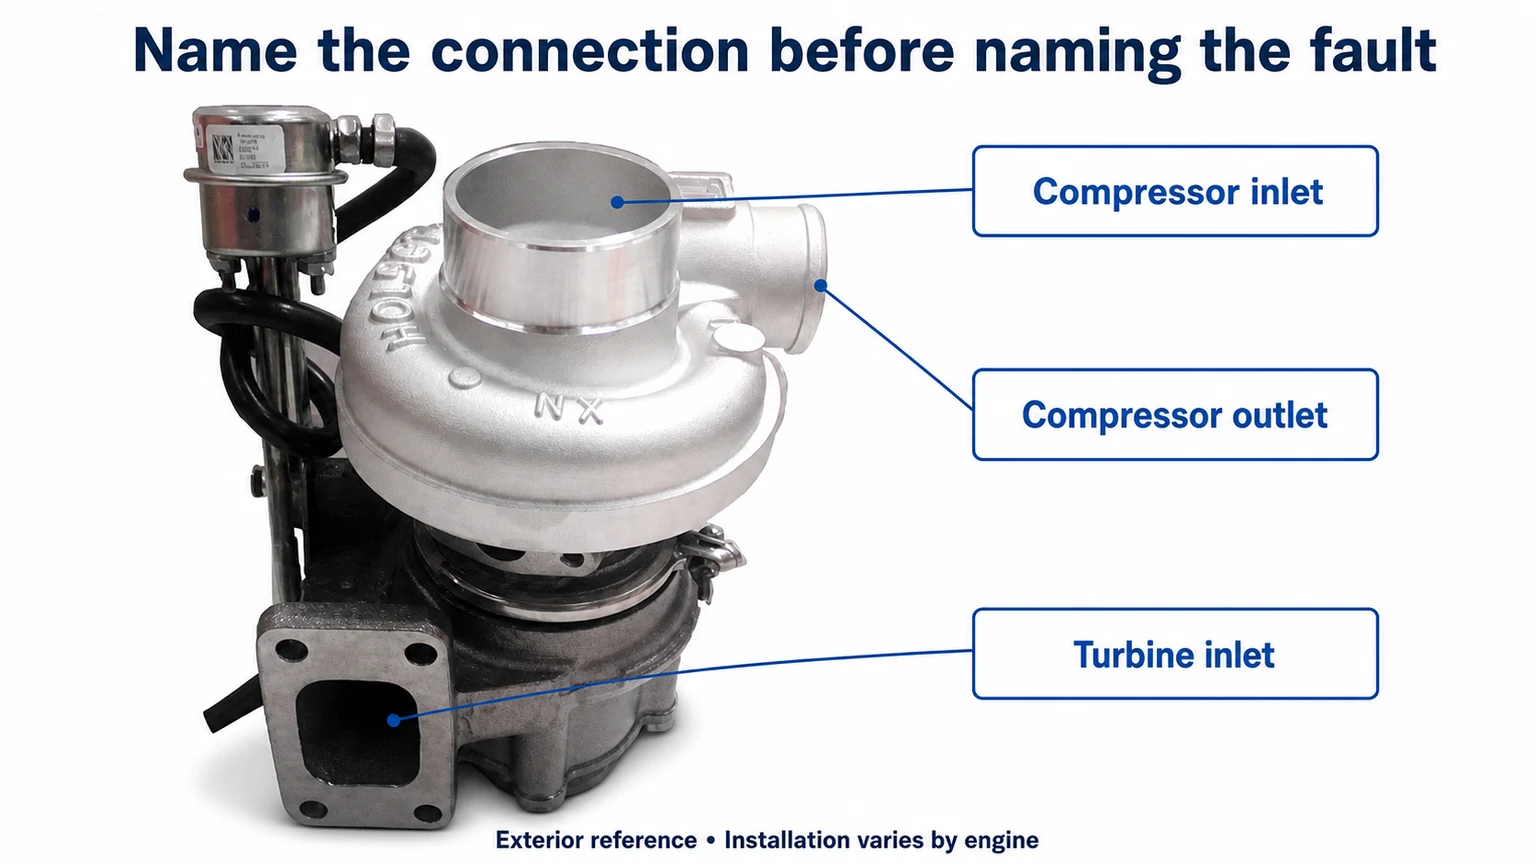
Use precise names in photographs and work orders. The compressor outlet carries compressed intake air. The turbine inlet receives exhaust gas. Calling both areas the “hot side” can send the parts team toward the wrong gasket or pipe, particularly when photographs are taken from different sides of an unfamiliar engine.
External-location reference only. The illustrated unit does not represent every engine's installation or establish a fault.
Describe what changed and when. “Whistles uphill after the intake was serviced” is more useful than “the turbo sounds bad.” Record the operating condition at the time of the complaint, whether power changed, and whether any warning or diagnostic code appeared. Include recent work on hoses, air filters, exhaust joints or the turbo itself.
Separate observations from interpretations. A driver may accurately report a new high-pitched sound without being able to identify its source. A technician may hear the sound near the turbo because nearby pipes transmit it. Preserve those observations without relabeling them as bearing failure before inspection.
A stationary, unloaded engine does not necessarily reproduce the airflow, pressure or temperature present during the complaint. The absence of the whistle in the workshop therefore needs context. It does not prove that a hose seals under load or that the original report was mistaken.
Any further operating test belongs under the workshop's safe procedure. This article does not recommend a high-load road run to make the fault louder. If testing is authorized, record the conditions and relevant engine data so that a later comparison can distinguish a real change from a different operating point.
Store the exact code and associated information before clearing it. A low-boost or control-related code can guide the investigation, but it is not a purchase order for a turbocharger. Ask what the code's diagnostic procedure found, not just whether the code was present.
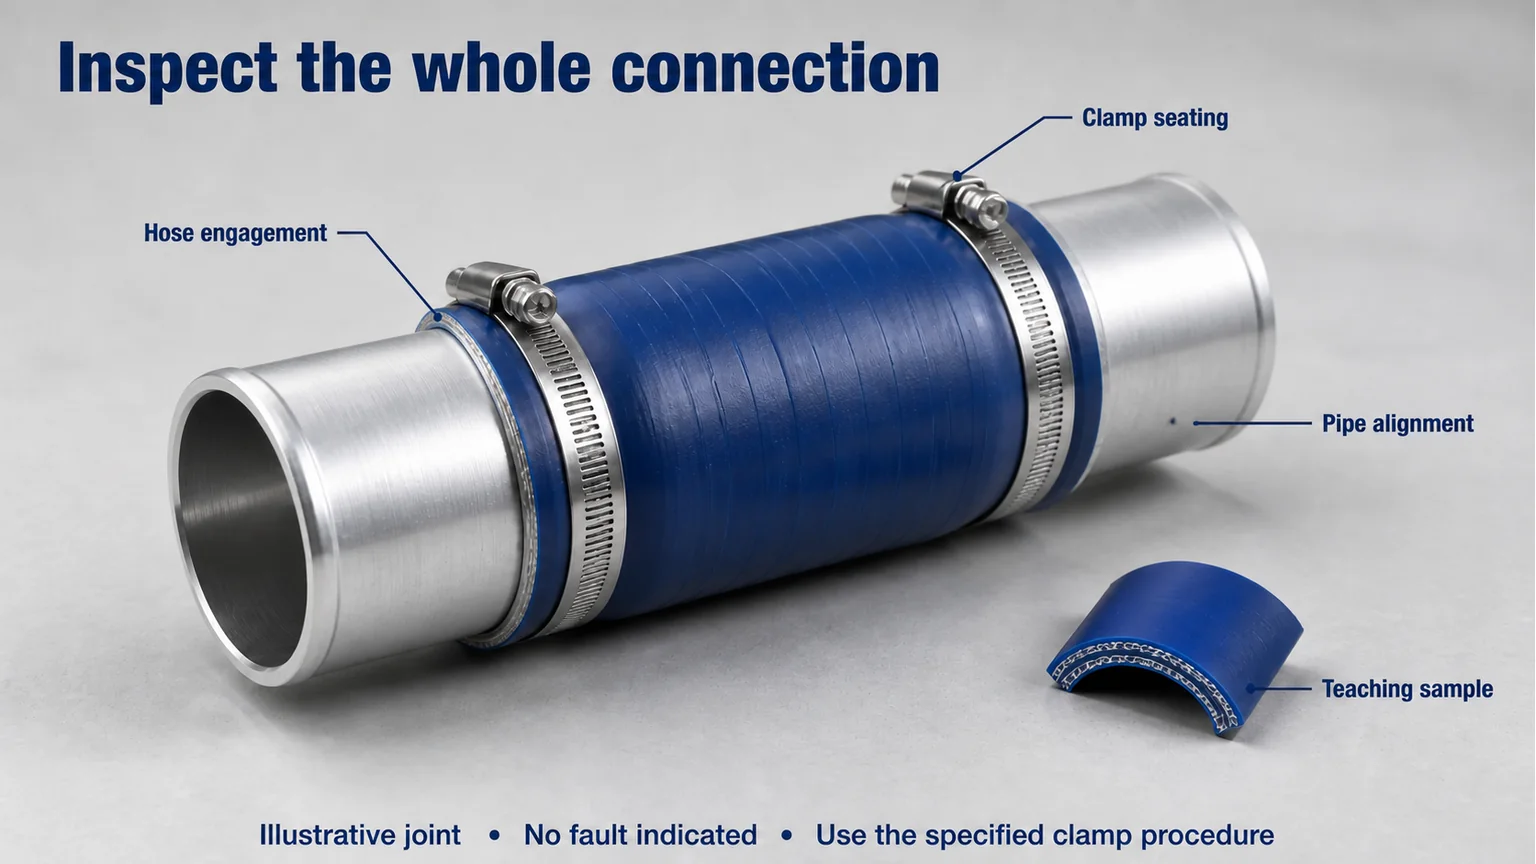
With the engine safely shut down, isolated and cool as required, examine the accessible connections specified by the service information. Look at the hose, mating pipe, retention feature, clamp position and surrounding support together. Replacing a visibly damaged hose without addressing a damaged mating surface or alignment problem can leave the cause unresolved.
A clamp being present does not show that it is correctly located or that the joint is serviceable. Conversely, a stain is not enough to declare the joint defective. Oil residue, dust and earlier service contamination may complicate the picture. Record the location, inspect the actual parts, and confirm leakage by an appropriate method where required.
Inspection areas are illustrated without marking a fabricated leak or prescribing a clamp torque.
Before disturbing a joint, photograph its installed relationship when safe. Keep a wider view that locates it on the engine and a close view of the relevant feature. A tightly cropped picture of a clamp may hide a hose pulled sideways or a missing support; a distant engine photograph may conceal the detail that matters.
On the exhaust side, preserve the distinction between a stain and a confirmed leak. Note where any residue is found and inspect the joint by the engine's procedure. Do not search for a hot exhaust leak with bare hands or improvise a test around rotating machinery.
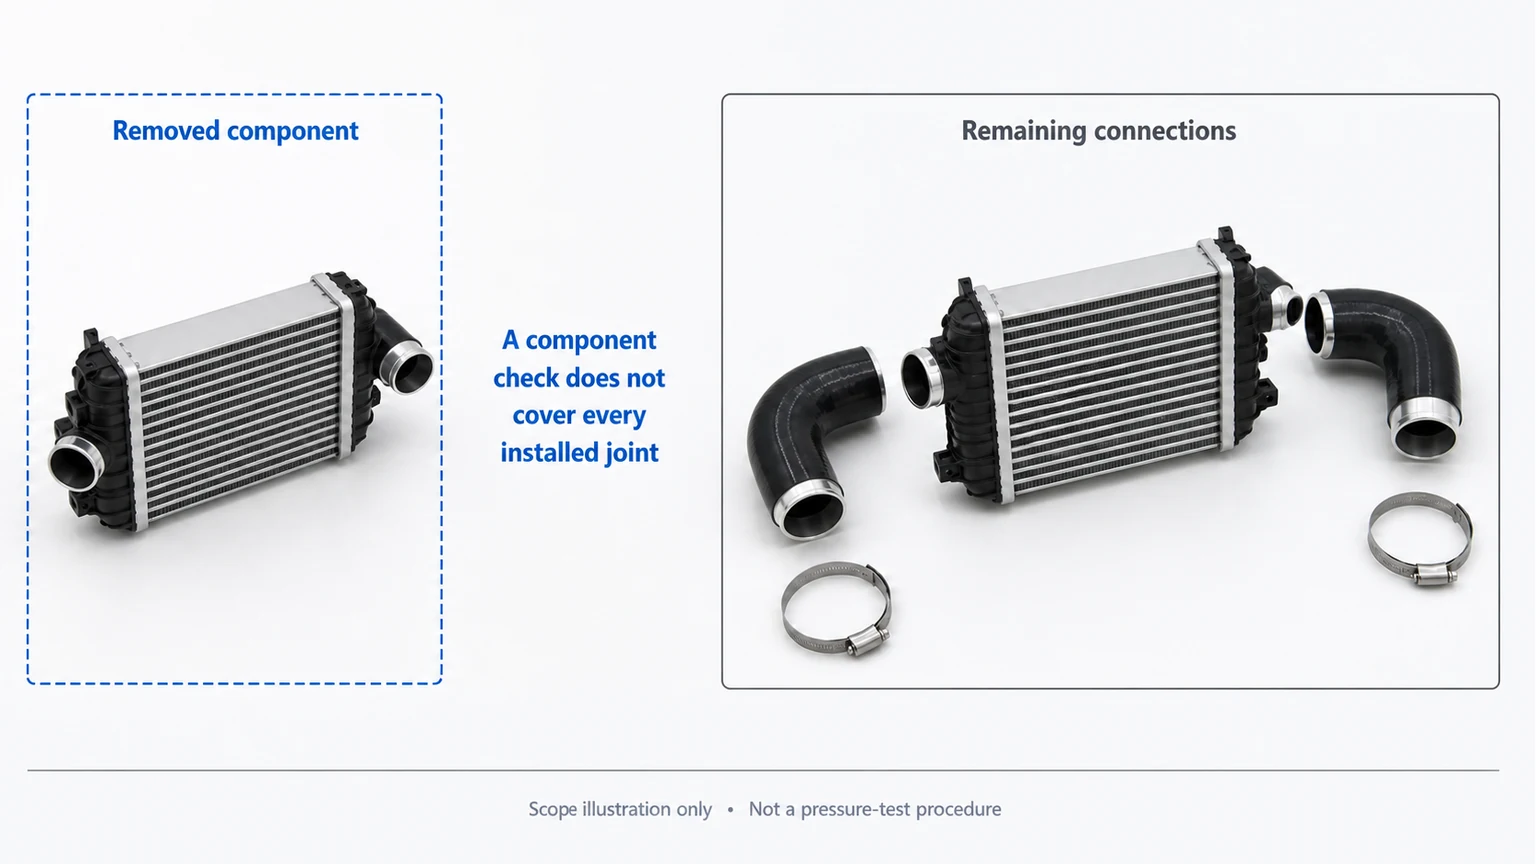
Ask which section was isolated, how it was sealed, and what approved method was used. A test of a removed charge-air cooler does not automatically test the vehicle's hoses and connections. A whole-path test may include additional routes that need to be understood before interpreting a pressure change.
The test record should identify its boundary in plain language: for example, a specific removed component or the section between two documented connection points. It should also retain the prescribed test conditions, the actual observation and the location of any confirmed defect. Without those details, “boost leak test passed” can mean different things to different people.
Conceptual scope comparison, not a pressure-test setup. Use the specified equipment, limits and isolation procedure for the engine or component.
Do not adopt a generic pressure, hold time or acceptable loss from another engine. The correct limits depend on what is being tested and how the manufacturer defines the method. An improvised cap or unsupported connection can create a hazard; a workshop must use equipment suitable for the prescribed test.
Once a leak is repaired, repeat the relevant verification and assess the original complaint under authorized conditions. A repaired joint and a remaining noise are not contradictory findings. More than one defect may exist, so retain the first result rather than discarding it when another problem becomes apparent.
The Cummins/Holset Turbocharger Failure Diagnosis Guidelines distinguish air or pre-turbine gas leaks from damage requiring turbo inspection. They also emphasize that rotor clearances are specific to the turbocharger. A hand-felt movement or a comparison with a different unit is not a substitute for the specified assessment.
If wheel damage, contact or another internal defect is confirmed, the next question is why it occurred. Preserve the findings and inspect the relevant upstream and downstream systems under the service procedure. Installing a replacement before resolving the cause can expose it to the same problem.
The choice between a complete assembly and a cartridge is a separate technical decision. A turbocharger-versus-turbo-core comparison helps define that supply scope, but does not authorize reuse of unassessed housings or controls. A cartridge is not a complete replacement for every damaged turbo, and the supplier should not be asked to infer the workshop's repair scope from a noise description.
This is not a guide to continuing operation with a suspected damaged turbocharger, severe oil consumption, wheel contact, overheating or an engine stop warning. Follow the manufacturer's response and the workshop's isolation requirements. Do not spin the wheel with compressed air, dismantle a running system or disable protective controls to reproduce a noise.
The article also does not provide a turbo upgrade recommendation, a universal noise limit, or a replacement interval. Modified induction and exhaust systems may change sound and operating behavior; their approval and diagnostic requirements must be resolved separately.
A hose or joint repair needs its own part identification; it should not be converted into a turbo order simply because the complaint mentioned the turbo. If a complete turbo is required, supply the engine identification, the full turbo nameplate reference, clear views of the connections and the required assembly scope. State whether an actuator or other supplied attachment is part of the request.
For fleet or distributor sourcing, ask Elecdura to quote the identified turbo assembly, quantity and delivery destination. Include the workshop's description of the confirmed failure and any unresolved identity question. This allows matching and quotation work to proceed without presenting supplier availability as proof of the diagnosis.
A changed intake arrangement can alter what is audible, but the timing does not establish that the change is harmless. Verify the correct filter and housing assembly, disturbed joints and any relevant service instructions. Compare the installed configuration with the approved one before accepting a new sound as normal. The same timing can also help locate a connection problem introduced during service; it is a useful lead, not a verdict against either the filter or the turbo.
A recording can document the complaint and help the workshop understand its timing. Microphone position, automatic level control and surrounding noise limit its diagnostic value, however. Send it with engine identification and inspection findings rather than as the sole basis for a replacement. A supplier can help identify the requested part, but a remote sound clip cannot establish wheel clearance, a sealed charge-air path or the condition of an exhaust joint.
Ask for the applicable claim instructions before cleaning, dismantling or returning the unit. Retain its identification, purchase reference, installation and failure chronology, and the workshop's photographs and test records. Keep the removed assembly identifiable and document any parts already disturbed. These records help the reviewer connect the reported complaint to the supplied unit and assess the failure sequence; they do not guarantee acceptance. Return authorization, packaging and the evidence required for a claim depend on the actual supplier's terms, not a generic diagnostic article.
Not by itself. A cartridge reference describes a different supply scope from a complete assembly, whose housings, connections and control equipment also matter. Record the full assembly identification and compare the proposed replacement's supplied components with the installed unit. If the nameplate is unreadable, provide photographs and engine identification and leave the match unresolved until it is verified. A similar rotating core does not establish that the complete unit will mount, connect or operate correctly on that engine.